Redirecting a WebHost survey link to a Snap XMP Online survey link
As part of the upgrade from Snap 11 to Snap XMP, you are able to redirect respondents from a Snap 11 Webhost survey to the upgraded version in Snap XMP Online. This is available for anonymous surveys only, for example, where you have printed a interview link on a poster and want to keep receiving the responses to this survey.
First, you need to upgrade the Snap 11 WebHost survey to Snap XMP Online. Once you have your Snap XMP Online survey link you can set the Redirect URL in WebHost. When you are ready to stop running the survey in WebHost, the URL redirection automatically activates so that respondents see the Snap XMP Online questionnaire. If you have responses collected in WebHost since upgrading your survey to Snap XMP Online, you can easily import them. This feature is available from Snap XMP Desktop version 12.13.
Upgrading the Snap 11 survey to Snap XMP
When moving onto using Snap XMP you need to upgrade existing Snap 11 surveys to the latest version of the Snap XMP software.
We recommend that you archive your Snap 11 survey before upgrading.
- Open Snap XMP Desktop and log into your Snap Online account.
- Click Survey Overview
 on the Snap XMP Desktop toolbar. This opens the Survey Overview window.
 - Click Online Surveys
 on the Snap XMP Desktop toolbar to show the online surveys available.
 - Right click anywhere on the list of surveys to show a pop-up menu and click Import Survey/Template. This opens the Import Survey or Template dialog.
- Click Browse to find the Snap 11 survey that you want to upgrade. Select the file then click Open.
- Select Include raw data to include the survey’s data responses. If this is disabled, then no data responses are available.
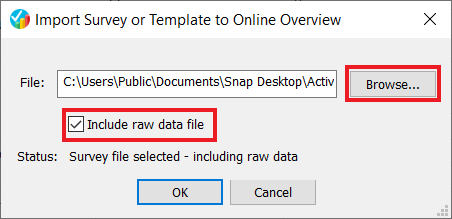
- Click OK to import the Snap 11 survey. This opens the New Online Survey dialog.
- You can change the name and title of the survey. Select a folder location for the survey. You can add a new folder by clicking the New Folder button.

- Click OK. This will convert the survey to Snap XMP and show the survey in the Survey Overview window.
Read more on other ways to upgrade to Snap XMP or watch our video on upgrading to Snap XMP.
Testing the upgraded Snap XMP Online survey
Once the upgrade to Snap XMP is complete, publish and preview the survey in Snap XMP Desktop or Snap XMP Online.
Make sure that the survey works as you would expect by creating test responses using the Snap XMP Online interview URL.
Customising the interview URL in Snap XMP Online
You may wish to change the URL in the upgraded survey. If you need to customise the interview URL you can do this in Snap XMP Online.
- In Snap XMP Online, select the survey from Your Work, then from the Summary tab, click the Collect link.
- In the Interview URL, click Edit interview URL
 . This allows you to change the end section of the URL link to a meaningful name, provided it is not already in use.
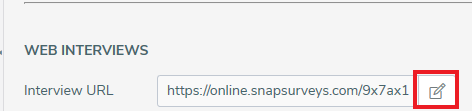
- Enter the new name. Click Save to save the changes.

Redirecting responses from WebHost to Snap XMP Online
Before adding the redirect URL in WebHost, start interviewing for the upgraded survey in Snap XMP Online.
Copying the Snap XMP Online URL
Copying the Snap XMP Online interview link to the clipboard makes it easier to enter the Redirect URL in WebHost.
- In Snap XMP Online, select the survey from Your Work, then from the Summary tab, click the Collect link.
- In the Interview URL, click Copy URL to clipboard to copy the Interview URL link. The Copy URL to clipboard icon is available for published surveys only.

Redirect URL in WebHost
- Log into WebHost.
- In Surveys, click the Snap 11 version of the survey.
- Click on the Setup tab.
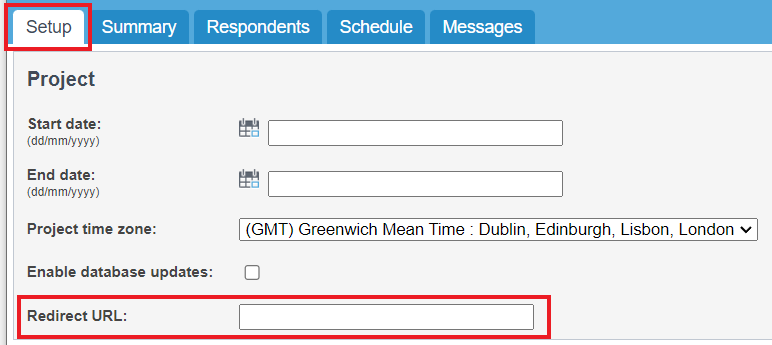
- In the Project section, enter the Redirect URL. If you have copied the Snap XMP Online URL for the upgraded survey then paste the link here.
- Click Save.
Testing the redirect in WebHost
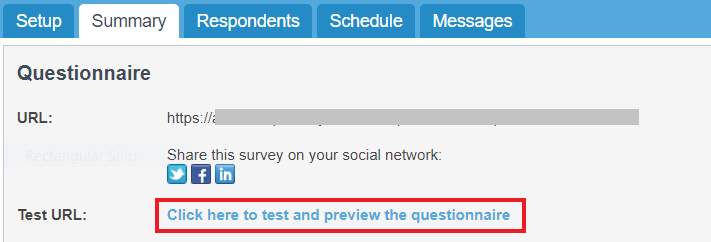
- In the Summary tab, the interview URL and preview link are available.
- Use the test and preview survey link to check that the survey redirects to the new Snap XMP Online link.
- When you have checked that the redirect is working, click the Stop questionnaire link to stop interviewing on the Snap 11 WebHost survey. This will start the redirect to the Snap XMP Online survey URL.

Importing WebHost responses to Snap XMP
You may have some responses that were submitted after you upgraded the survey to Snap XMP. If this is the case, download any outstanding responses from WebHost, then import the responses into the survey using Snap XMP Desktop. Once the responses have been imported, Snap XMP Desktop will synchronize them to Snap XMP Online.
Downloading responses from WebHost
- In the Summary tab, click on the Download Snap data link to download the outstanding data responses from WebHost.

Editing the WebHost data response file
Only follow this step if you changed the survey name when you upgraded the Snap 11 survey to Snap XMP.
Prior to importing the responses, if you have changed the survey name when upgrading the survey to Snap XMP, you will need to edit the WebHost data response file and set the new survey name for the first message only.
- Open the WebHost data response file that you have downloaded. This is often in the Downloads folder.
- Open the file in a text editor, for example Notepad.
- On the fourth row down, you will see the line containing the survey name.
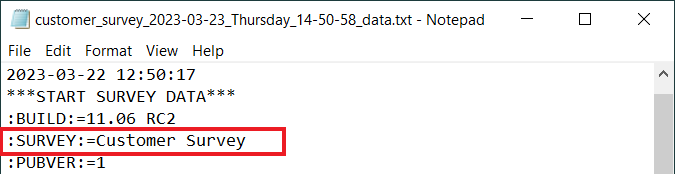
- Edit the survey name to show the new survey name. You only need to do this on the first response in the file.
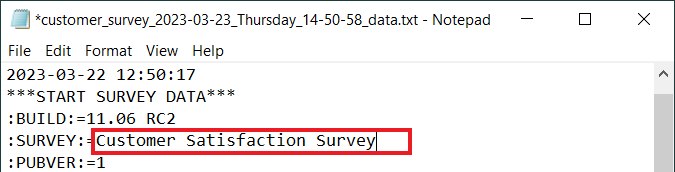
- Save the data responses text file.
Importing the WebHost data response file
- In Snap XMP Desktop, open the Survey Overview window, then open the upgraded survey.
- Click Data Entry
 on the Snap XMP Desktop toolbar. This opens the Data Entry window.
 - Click File | Import on the Snap Desktop menu. This opens the Data Import window.
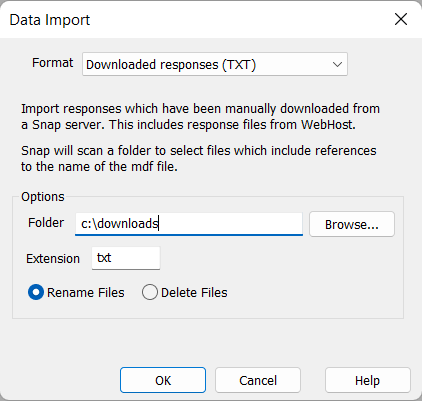
- In Format, select Downloaded responses (TXT).
- In Folder, enter the folder location of the downloaded data response file. You can also use the Browse button to search for the folder. The import process scans this folder to select files which include reference to the name of the mdf file, usually this is the name of the survey.
- In Extension, enter ‘txt’.
- Select Rename Files or Delete Files to rename or delete the data response file following the data import.
- Click OK to import the responses into the upgraded survey.