Using Styles
Snap XMP comes with a number of question styles. They are all available for use in Snap XMP Desktop. We have developed a sample questionnaire that shows the different question styles. You can use this questionnaire to see how the questions behave in a live interview.
Choosing a question style in Design mode
When you are designing the questionnaire in the Questionnaire window, the question style drop-down list shows the most used styles, and a “More Styles” entry at the end of the list. Click this to open the Style Picker, which contains a list of all the available styles.
You can also access the list by clicking Style Picker ![]() on the Questionnaire toolbar. The Style Picker tool is an easy way of applying a question style to questions in your questionnaire. This tool is only available in Design mode
on the Questionnaire toolbar. The Style Picker tool is an easy way of applying a question style to questions in your questionnaire. This tool is only available in Design mode ![]() .
.
Temporary Question Styles
Changes made to a question in Design Mode ![]() will create a new temporary style called “like” followed by the original style name. For example, when you change the style of an Open Ended question, the question changes to “like Open Ended“.
will create a new temporary style called “like” followed by the original style name. For example, when you change the style of an Open Ended question, the question changes to “like Open Ended“.
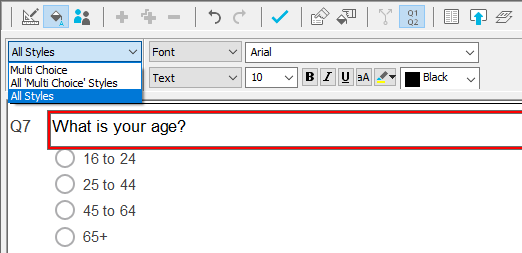
You can select the type of styles you would like to view in the preview window, by selecting from ‘All Styles’, ‘All Variables’, ‘Named Styles’, ‘Unused Styles’ or ‘Used Styles’ in the Style drop-down list.
Using Style mode to modify question styles
Style mode ![]() allows you to make modifications to the styles, whereas Design mode allows you to modify the individual questions. Style mode allows you to make consistent changes to all questions of the same style, without having to make individual question changes.
allows you to make modifications to the styles, whereas Design mode allows you to modify the individual questions. Style mode allows you to make consistent changes to all questions of the same style, without having to make individual question changes.
The style selection box
| Style Selection Box | Description |
| Multi Choice | Changes will apply to the selected question and all other questions that use the same style as the selected question. In addition, any styles that are derived from the style of the selected question where settings still remain the same will adopt the changes. |
| All ‘Multi Choice’ styles’ | Settings will apply to the selected question and all other questions that use the same style as the selected question. In addition, the settings will apply to any questions that use styles derived from the current style. For example, “like multi choice” questions will also change. |
| All styles | Settings will apply to all styles. The settings will be stored as the default style settings. |
The following rules explains how styles affect other questions according to the value selected in the style selection box:
- questions that use the same Style as the highlighted question also change
- questions that are not based on the Style of the highlighted question do not change
- questions whose Style is based on the selected question’s style only change if the attribute that changed had the same value in both styles
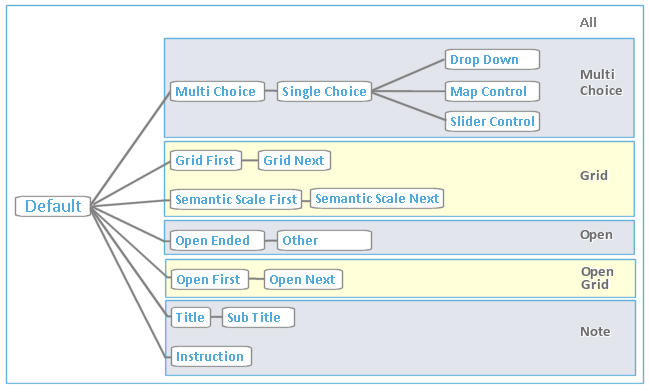
Based on Styles
Not all styles behave in the same way when changes are made; some Styles are based on others. In addition to the ten pre-set styles, there is a Default style that is considered the parent style for five of the pre-set styles: Multi Choice, Grid First, Open Ended, Open First, Title and Instruction. In the same way, Title is the parent style for Sub Title.
The ten pre-set styles are Grid First, Grid Next, Instruction, Multi Choice, Open Ended, Open First, Open Next, Other, Sub Title, and Title.
All Styles derive from the default, either directly or through other styles as the diagram shows.
Style attributes
Each Style has Style Attributes which affects a number of different question elements. You can either set the value of each attribute, or it can inherit its value from other styles. The table below shows the full list of Style Attributes.
| Attribute | Affects |
| Alignment | Name, Text, Grid Name, Grid Label, Position, Code Label, Code Value, Data, Code Box, Code Go To, Footnote. |
| Background | Question Area, Answer Area, Name, Text, Grid Name, Grid Label, Position, Code Label, Code Value, Code Box, Box Area, Code Offset, Code Gutter, Code Verge, Code Go To, Footnote. |
| Borders | Question. |
| Boxes | Box Style, Check Mark, Force Square, Drop-down, Image. |
| Break | Column Break, Page Break, Section Break. |
| Columns | Number, Arrangement, Full width. |
| Find | Find, Next, Previous, Find and Replace. |
| Font | Name, Text, Grid Name, Grid Label, Position, Code Label, Code Value, Data, Check Mark, Code Go To, Footnote. |
| Margins | Name, Text, Grid Name, Grid Label, Position, Code Label, Code Value, Data, Check mark, Code Go To, Footnote. |
| Numbering | Number Format. |
| Positions | Question, Code Box. |
| Response | Response Type. |
| Show | Name, Text, Grid Name, Grid Label, Position, Code Label, Code Box, Code Leaders, Code Value, Space Before, Code Go To, Footnote, Line Before, Semantic Scale, Grid Leaders, As Drop-down, as Map Control, as Slider Control. |
| Tabs | Name, Text, Grid Label, Code Offset, Code Gutter, Code Verge, Code Values, Code Go To, Open Label. |
The Question Elements
The Style of a question defines its appearance in the questionnaire for each of its different Elements (see table below). You can change the location or format of each element in the questionnaire.
| Element | Description |
|---|---|
| Answer Area | The background area around the answer box and label. |
| Box Area | The area around the answer code box. |
| Code Box | The checkbox for a multi- or single-response closed question or the text box for an open-ended question. |
| Code GoTo | Space for questionnaire routing instructions based on a response to the question. |
| Code Gutter | The spacing between columns, used with the Tabs and Background topics. |
| Code Label | The text describing a response for a question. |
| Code Leader | Markings between the Code Label and the Code Box to show their association, used in paper editions only. |
| Code Offset | The space to the left of the answer code, used with the Tabs and Background topics. |
| Code Value | The numerical value assigned to a response. |
| Code Verge | The space to the right of the answer code box, used with the Tabs and Background topics. |
| Footnote | A box located below or beside each question, used to display additional text. |
| Grid Label | The text describing a grid row. |
| Grid Leader | Markings between the Grid Label and the Grid Box to show their association, used in paper editions only. |
| Grid Name | The number of the grid row. |
| Line Before | A line inserted before a question, used with the Show topic. |
| Name | The question number in the questionnaire. |
| Open Label | The space used for the code label on open questions, used with the Tabs and Background topic. |
| Question Area | The background area around the question text, used with the Background topic. |
| Space Before | Space added before a question, used use with the Show topic. |
| Text | The question text. |
Organising the question styles
The Style Organiser tool allows you to view the styles you have used within the questionnaire. Style Organiser is only available in Style mode ![]() and can be used to sort styles, as well as rename and make copies of styles.
and can be used to sort styles, as well as rename and make copies of styles.
In Style mode ![]() , clicking the Style Properties button
, clicking the Style Properties button ![]() . This opens the Style Properties dialog for the selected question style, where you can change the style name, based on style and the question that can follow this style.
. This opens the Style Properties dialog for the selected question style, where you can change the style name, based on style and the question that can follow this style.
You can save the question styles as a Style Template so that you can use them in other questionnaires. This helps to create questionnaires with consistent branding.