Anonymisation in Surveys – Sending an email that doesn’t identify the participant
When distributing an anonymous survey, you can set up your participant database in Snap XMP Desktop or Snap XMP Online. The survey responses are not linked to a given participant. Participants are not tracked to identify whether they have responded, although if a participant opts out of the survey Snap XMP Online records this to ensure that the participant does not receive further emails. This tutorial describes how to set up the participant database in Snap XMP Desktop. Please see tutorial Anonymisation in Surveys – Sending an email that doesn’t identify the participant (Snap XMP Online) on how to set up the participant database in Snap XMP Online.
Making sure the participant is anonymous
What you need
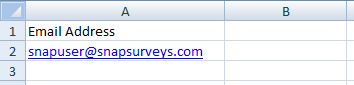
- A unique email address for each participant.
Creating a new database link
- In the Survey Overview window, open the survey.
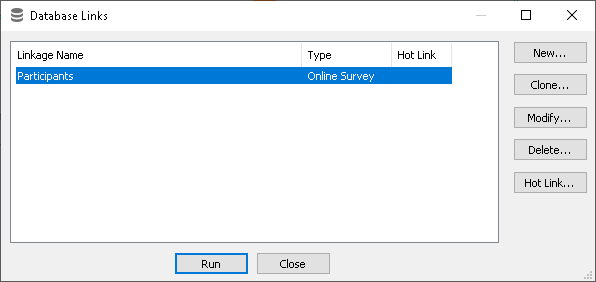
- Click Database Links
 on the Snap XMP Desktop toolbar or select File | Database Link to open the Database Links window.
 - Click the New button. This opens the Database Linkage Wizard where you create a new database link.
Selecting the participant file
- In the Database Linkage Wizard, select Online Invites/Logins/Seeding option. Click Next to select the database file.

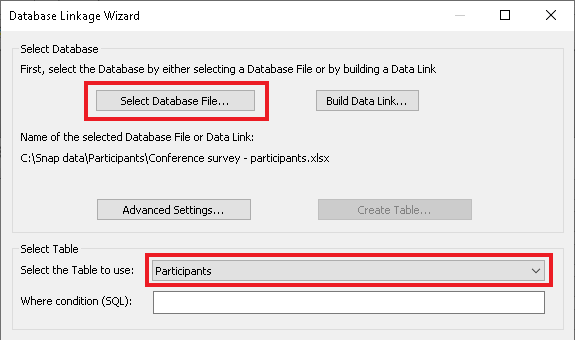
- Click Select Database File and browse to the file containing the participants’ email addresses. Click Next.
Creating the email invitation
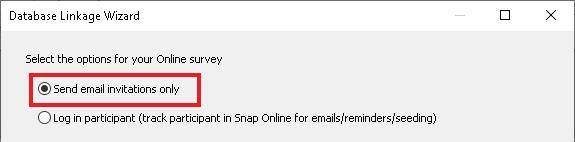
- Select Send email invitations only as participants are not going to be tracked. Click Next.
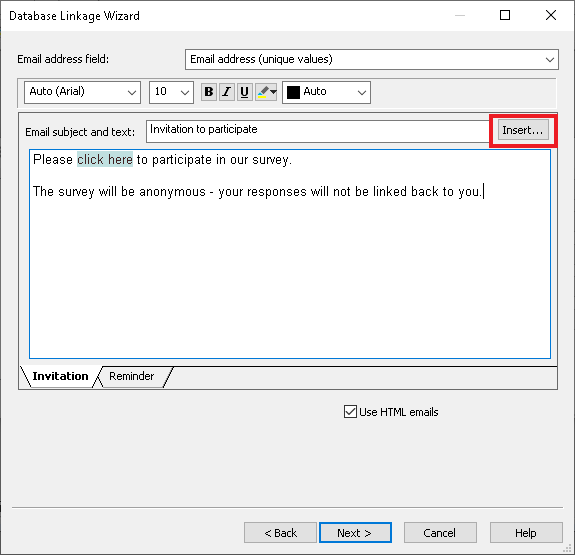
- The email invitations are created next. Check the Use HTML emails if you wish to have styled HTML emails.
- Set the Email address field option; select the appropriate unique email address from the drop down menu.
- Add a subject heading in the Email subject and text box.
- Type the email message in the Invitation tab and if required, the Reminder tab.
- Click Insert to add a Survey Location link. This provides a link for the participant to access the survey and must be included in the email message.
- You should also include a link enabling your participants to opt out of the survey using the Survey Opt Out link by clicking Insert.
- Click Next. You will see a summary of what the database link does. Give the database link a name.
- Select Finish returning to the Database Links dialog.
Generating the participant data
Participant seeding options
These are the options you can use when updating participant information and seeding. This option is selected when you generate the participant data. These are the options available in the Participants and Seeding drop-down.
Option | Description |
Do nothing | Does not load any participant or seeding data changes to Snap XMP Online. |
Add new participants only | Add new participants’ data will be loaded but this will not update any changes to existing participants’ data. |
Update participants | This will insert new participants and also update changes to existing participants’ data. This may overwrite any changes made in Snap XMP Online to existing participants. This option will not remove participants that are no longer in the new list of participants or that have been added in Snap XMP Online. |
Replace all participants | This will replace all participants’ data by removing all the existing participants and replacing them with the new list. This will remove existing participants that are no longer in the new list of participants. This will mean any updates made to participants or new participants added in Snap XMP Online will be lost. |
Invitation and reminder options
These are the options you can use when updating invitations and reminders. This option is selected when you generate the participant data. These are the options available in the Invites and Reminders drop-down.
Option | Description |
Do nothing | There are no changes made. The process will not upload any invitation or reminder changes to Snap XMP Online. |
Define or replace | This will add the invitation and reminder when they are generated for the first time. When there are already uploaded invitations and reminders this option will remove all the existing invitations and reminders to replace them with the new invitation and reminder set up in Snap XMP Desktop. |
Instructions
- Click Run to generate the new participant data. This displays the Run Database Link dialog.
- The Database Link contains the link that will be generated and the Online Account that the Snap XMP Online account where the participants are generated. This information is read-only.
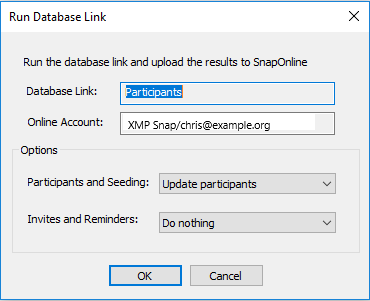
- Choose an option for Participants and Seeding.
- Choose an option for Invites and Reminders.
- Click OK to automatically upload the participant data to Snap XMP Online.
- You can now publish this survey.
- You can manage the list of participants in Snap XMP Online.
If there is a topic you would like a tutorial on, email to snapideas@snapsurveys.com