Interlocking quotas
This tutorial explains how to limit respondents in multiple categories, for example, by gender and age, also known as an interlocking quota.
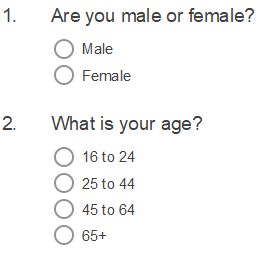
You can find these questions in the Reference Survey Pak (Personal demographics) supplied with Snap XMP.
Step 1: Create a derived variable
To set up an interlocking quota, you first need to set up a derived variable in your survey.
- Open the survey in Snap XMP Desktop.
- Click Variables
 on the Snap XMP Desktop toolbar. This opens the Variables window.
 -
Click New variable
 to create a new variable.
- Name the variable AgeGenderGroup, and label it Age and gender groups.
- Set the Type to Derived, the Response to Single.
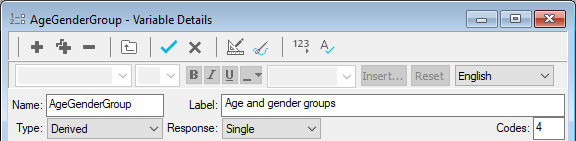
- In the code list add the code labels and values:
| Label | Values |
| Males under 25 | Q1=1 AND Q2=1 |
| Males 25 and over | Q1=1 AND Q2=(2,3,4) |
| Females under 25 | Q1=2 AND Q2=1 |
| Females 25 and over | Q1=2 AND Q2=(2,3,4) |
-
Click Save
 to save the variable.
Step 2: Set up the quota for the variable
- Select View | Quotas and Screen Outs. This opens the Quota and Screen Outs window.
- Click New Quota or Screen Out
 then select New Quota. This opens the Quota dialog.
 - In Name, enter AgeGenderQuota.
- In Variable, select the variable AgeGenderGroup. When you select a variable, the Details table lists all the answer codes. The target for each category is available as a number or percentage. When you enter a target number, this automatically updates the percentage and overall target. Once interviewing has started Actual and % show the latest response counts.
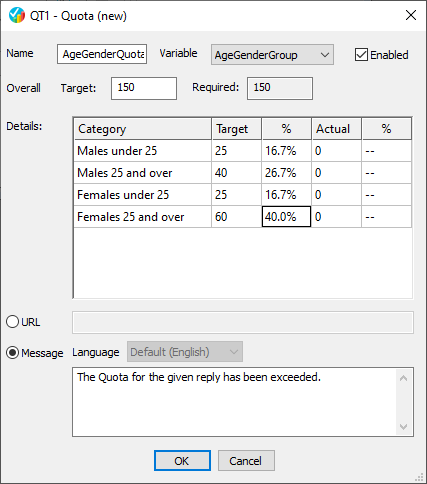
- When the quota is exceeded, the participant is directed to a web page or shown a custom message. In multilingual surveys, select the language then enter the message for the selected language. Further details are available at: Notifying the participant when a quota or screen out is exceeded
- Click OK to save the quota. The Quota and Screen Outs window shows the new quota.
Step 3: Enable the quota
You can enable quotas individually or at the survey level, which is the default. You can change this in the Quota Control dialog.
In the Quota dialog, select Enabled to activate the selected quota. Clear Enabled to disable the selected quota.
If there is a topic you would like a worksheet on, email to snapideas@snapsurveys.com