Filtering the analyses for shared users
In Snap XMP Online you can use the filter feature to filter or restrict the response data that researchers and analysts can access on their shared accounts.
If you use shared accounts on Snap XMP Online, you can set up a filter for each survey which will be applied to the shared user’s view of all the analyses in that survey.
The survey must include a question that identifies the appropriate data for the filter. For example, this can be a question that provides a department, college, business, or location. You can then set up filters on the shared account which will provide access to view only the relevant data.
Step 1: Finding the variable details
The list of the survey’s variable details is available in both Snap XMP Online and Snap XMP Desktop. You will need the variable details to create the filter expression.
In Snap XMP Online
- Log into Snap XMP Online.
- In Your work, select the survey that you are sharing.
- Click the Collect tab. This shows the Overview section
- Click Variables on the side menu. This shows a list of the variables for the survey. The list includes the system paradata variables.
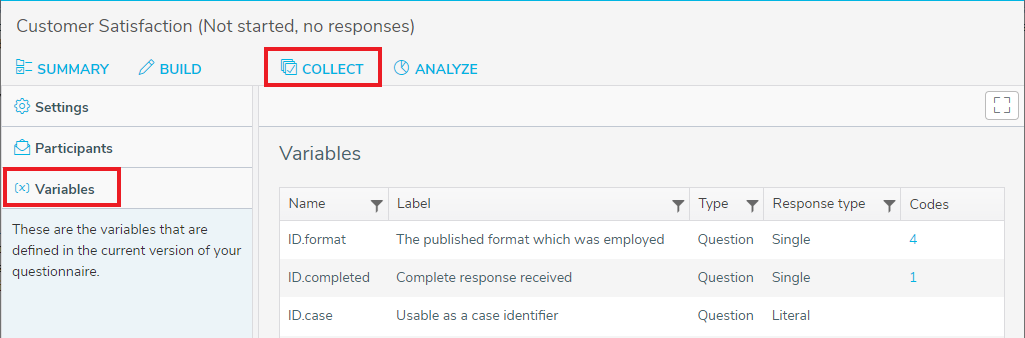
- In the Codes column, click on the numbered link to show a list of the available codes for that variable.

In Snap XMP Desktop
- On the Snap XMP Desktop toolbar, click Variables
 to open the Variables window.
 -
Click
 on the Variable window toolbar to display the Print Variable Details dialog.
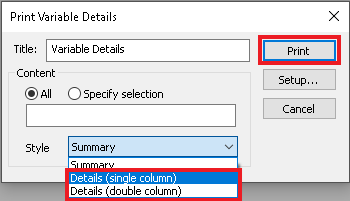
- Select All to print the definitions of all the variables in your survey. Select Specify selection to filter on selected variables then enter the names of the variables, separated by commas, in the list, e.g. Q2, Q3.
- In Style, select Details (single column) or Details (double column) to print the details of the variable. The report layout can be a single column or double column format, depending on the selection.
- Click Setup followed by Printer Setup. Select the printer or to print to a file. Click OK twice to return to the Print Variable Details dialog.
- Click Print. This generates a report showing the codes for the selected variables. This is available as a reference when defining your filter.
Step 2: Sharing the survey and adding a filter
Other Snap XMP Online users are given permission to share a survey through the Shares tab in of Snap XMP Online.
- Log in to Snap XMP Online and the first page shown is Your work. If you are already logged into Snap XMP Online, click Home to return to Your work. The Summary tab shows by default.
- Select the survey that you want to share.
- Select the Shares tab. This lists the users who you have shared the survey with.
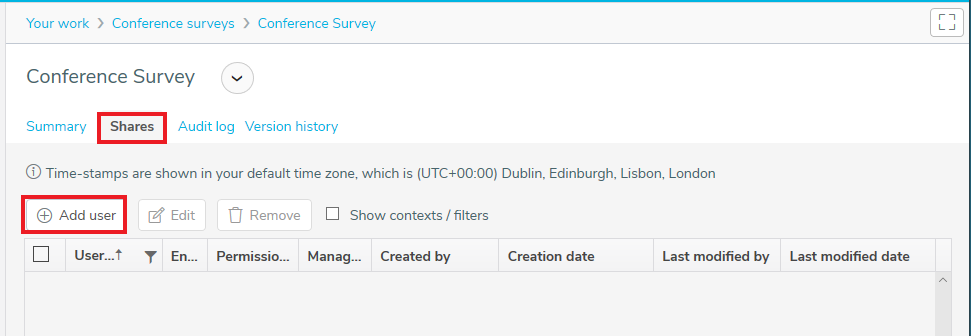
- Click the Add user button to enter the details of the user you want to share the survey with. The user must have a Snap XMP Online account.
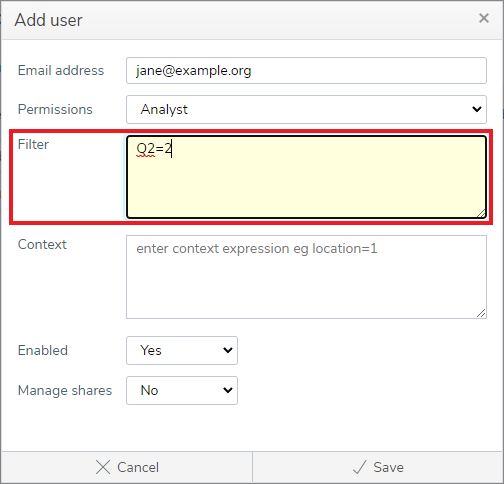
- In the Add user dialog enter the user’s email address that they use to access their Snap XMP Online account.
- Next set the Permissions for the user. Further information on the permissions is available at Sharing overview.
- Type the required filter in the Filter field (Q2=2 in this example). Note, that the filter is not checked at this point. It is only checked when it is used, and it is only used when the client logs in and looks at analyses.
- Set Enabled to Yes for the user to have access to the shared survey or survey template.
- Set Manage shares to No if you do not want the user to share the survey with other account holders or set to Yes if you want the user to be able to share the survey with other Snap XMP Online account users.
- When you have entered the user details, click Save to add the user. The user has access to the shared item. The Shares list displays the new user.
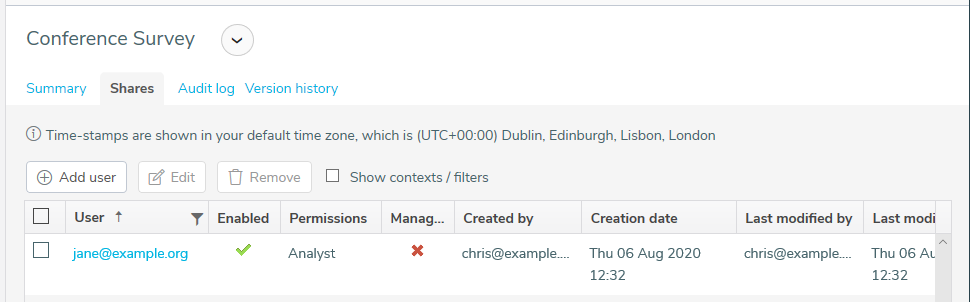
- The survey or survey template now shows with the shared icon

Step 3: Testing the filter
- Log into Snap XMP Online using the shared user’s login details.
- Select the survey with the filter value you have just set up.
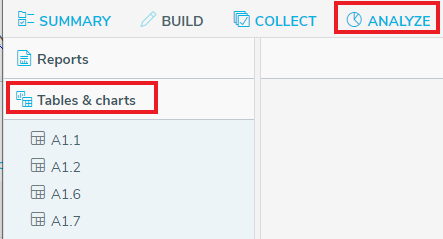
- In the Summary tab, click the Analyze link
- Click Reports or Tables & charts in the side menu then select a report or analysis.
- Confirm that the filtered results are as you expect. If you have made an error when applying the filter, you will now see a message. Look at any other results to confirm that the filter applies to all of them.
- Click Log out.
If there is a topic you would like a worksheet on, email to snapideas@snapsurveys.com