How to customise check boxes using style mode
There are two modes available in the Questionnaire window that can help you create questionnaires. These are: the Design mode where you can add and modify individual questions and the Style mode where you define the look of the question types used in the questionnaire. Style mode allows you to change the questions appearance and create a customised question style using your organisation’s branding such as font, colour scheme and background.
In this tutorial, the style mode is used to show how to customise check boxes and radio buttons in the closed question styles including Multi Choice, Single Choice, Grid and Semantic Scale styles. In Snap XMP Desktop, the default style is a check box for multiple response questions and a radio button for single response questions. Snap XMP Desktop provides image files that you can use for check boxes and radio buttons. These are in pairs, comprising an empty and a checked/selected version of each graphic. You can:
- use the defined pairs of Snap XMP Desktop box graphics
- combine the Snap XMP Desktop box graphics into different pairs
- use your own graphics
The Snap XMP Desktop graphic box naming convention is used to define pairs of check boxes and radio buttons. If you create your own images, using the same naming convention will let you see them in the list of On and Off images when you browse for them. Groups of check boxes and radio buttons with the same name will be synchronized, if this option is selected.
| Checked | Unchecked | |
| Check box | check-Name-on check-Name-x (cross) check-Name-t (tick) | check-Name-off |
| Check box (Rounded square) | checkRS-Name-on checkRS-Name-x checkRS-Name-t | checkRS-Name-off |
| Radio button | radio-Name-on radio-Name-x radio-Name-t | radio-Name-off |
Once the new question style is complete you can save the new style to use in other questionnaires or create a Survey Template based on the questionnaire.
Step 1: Setting the box images
In this tutorial, a Multi Choice question style is used and the boxes are set to a specific image in Style mode.
-
In the Questionnaire window, click Style Mode
 on the Questionnaire toolbar.
- Select the Multi Choice question. Selected questions are highlighted in red in Style mode.
- In the Question style list, select All ‘Multi-Choice’ Styles. Any changes will be applied to all questions with a Multi Choice question style.
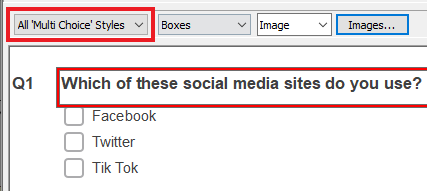
- Select Boxes in the topics list then select Images in the adjacent list, as the type of box.

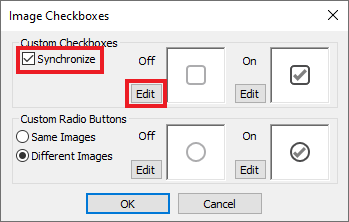
- Click the Images button on the toolbar to open the Image Checkboxes dialog.

- Check the Synchronise box to apply a set of four images that are defined using the Snap XMP Desktop graphic box naming convention.
- Click the Edit button by the Off (unselected) box. This opens the Image Properties dialog.
- Click Browse to select a new image for the boxes. Snap XMP Desktop checkbox images are stored in the sub-folder Styles\Checkboxes of your installation folder.
- Select the folder containing the image size you want then select the image style required.
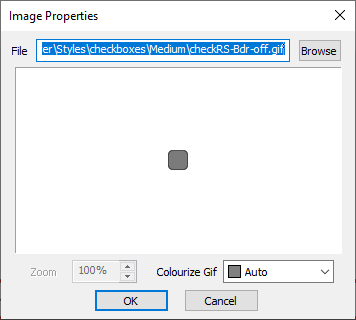
- Set a color in the Colourize Gif field if you want to match the box color to your branding.
- Click OK to use the selected style for checkboxes and radio buttons in all your multi-choice questions.
- Click OK again to return to the questionnaire. All the Multi Choice questions show the updated check box images.
Step 2: Saving the new question style
You can save any changes as a question style so they can be re-used.
-
Make sure you are in Style mode
 and select the multi-choice question you have changed.
-
Click Style Organizer
 on the Questionnaire toolbar. This opens the Style Organiser.
- The style of the selected question is highlighted and an image of the question is displayed in the Example pane.
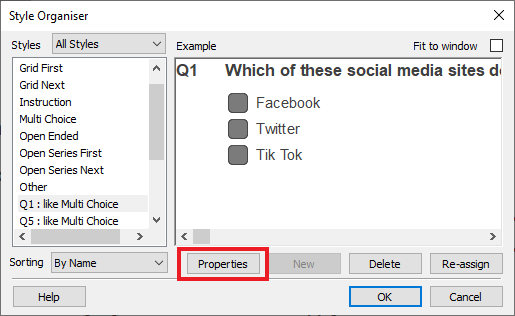
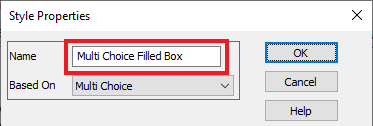
- Click Properties to open the Style Properties dialog
- Change the Name to describe the style.
- Click OK to save your style. The new style is now available for you to use elsewhere in the survey.
Further information can be found in the help on Changing the question boxes and Using Styles.
Saving the questionnaire styles
The questionnaire styles can be saved in a Style Template or the questionnaire can be used to create a Survey Template.
To save the question styles as a Style Template:
-
Click
 to change to the Design mode.
-
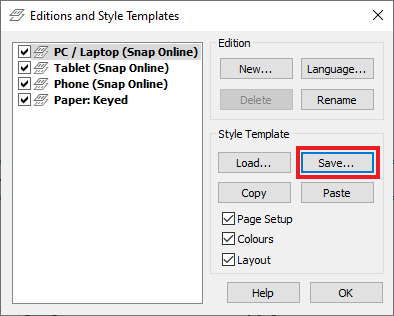
Click
 on the toolbar to open the Editions and Style Templates dialog.
- Click Save to save the style template. You can use these styles in a different questionnaire by loading the saved style template from the same dialog.
Saving the questionnaire to create a Survey Template is described in the tutorial Creating a branded Survey Template.
If there is a topic you would like a worksheet on, email to snapideas@snapsurveys.com