Adding name and address details to a printed questionnaire
Inviting participants to complete a paper questionnaire often involves mailing the questionnaire. Adding the name and address of the participant on the first page of a questionnaire or covering letter can make this process easier.
This worksheet uses Snap XMP Desktop to insert participants’ names and addresses on the first page of a questionnaire, load the participants’ address details from a spreadsheet and then use them to print ready for mailing.
Step 1: Adding the name and address to your survey
In order to display the participant name and address details in the questionnaire, you will need to create some variables to contain this information
- In the Survey Overview window, choose whether the survey is online or offline then open the survey in the Questionnaire window.
- Make sure that you select the Paper edition that is going to be printed.
-
Click New Question
 . This question will be used to add the name and address lines.
- Select the Open Series First style from the style selection menu.

-
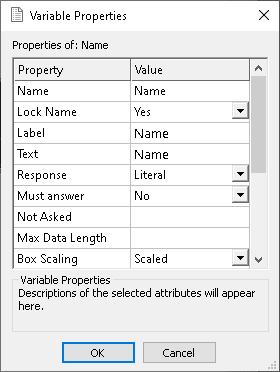
Click Variable Properties
 . In the Variable Properties dialog, change the Name property to Name and click OK. This is not required, but will help to match the name and address to the correct fields in the database or spreadsheet.
- Select Tabs in the toolbar topics, and then select Name. Set the tab value to 0%. Then repeat with Grid Label.

- Click on the question box and press the tab key to add as many additional Open series questions as required. E.g. If you have 5 fields in your database that contain the name and address details then you would create 5 Open Series questions. Rename these variables, as explained in 5 above, if appropriate.
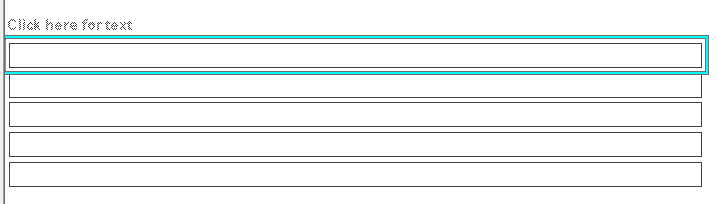
- Select Show from the toolbar topics then select Text and clear the Show checkbox. This hides the Open Series question text.

Step 2: Removing the question box borders
Although the question boxes are useful in making it obvious where the variables are in the questionnaire, they are not required when printing the address details onto the paper questionnaire.
- Click the question to select it and remove the boxes by selecting Boxes in the toolbar topics, and then select <None>. The questionnaire now appears to have a blank area where the address variables are. Note: box outlines not available for scanning editions.

- If the survey has other editions, which do not display the address, you need to hide the address lines in each of those editions. To hide the address, select an address line then select Show in the toolbar topics. Select (All) and clear the Show checkbox.
Step 3: Importing the participant name and address details
You will need a list of your participants’ names and addresses in a spreadsheet or database format.
- Click Database Links to display the Database Links dialog and click New.
- In the Database Linkage Wizard select the Import from database option and click Next.
-
Click Select Database File and browse to the file containing the participant data. . If connecting to a database select the Build Data Link option and enter the connection details.
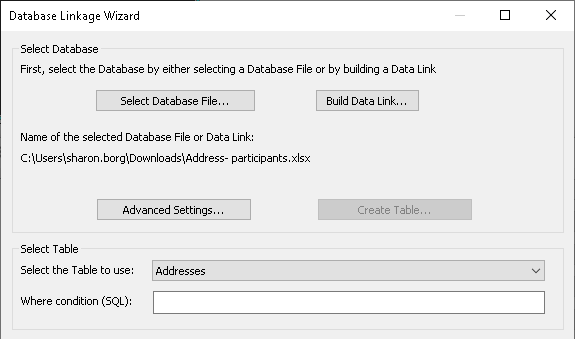
- In Select the table to use, select the table or worksheet required. Click Next. If you do not wish to import details for all the participants in the file, you can set a filter in Where condition (SQL).
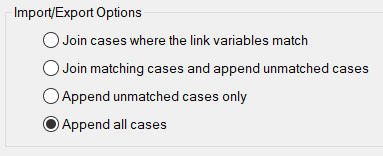
- In Import/Export Options, select Append all cases. This option imports new cases from the data file and appends them to the existing cases. If you already have cases in your survey, you can select a different option so identical cases are not imported. Click Next.
- The next page allows you to map the fields in the database or spreadsheet to the fields in the questionnaire. Select the Snap variable in the right-hand column with the corresponding the name and address fields from the database or spreadsheet. Click Next.

- A summary of your database link is displayed. If you wish, change the name of the link to something easily recognisable. Click Finish to save the database link then click Close to close the Database Links dialog.
Step 4: Previewing and printing your questionnaire
-
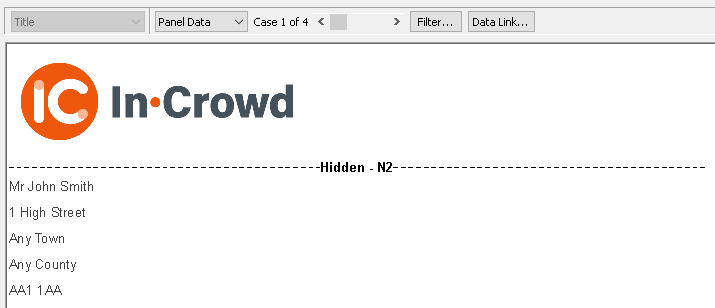
In the Questionnaire window click Data View mode
 on the questionnaire toolbar to see how the printed questionnaire will look.
- Select Panel Data from the dropdown list. If it is the first time you have selected Panel Data, you will be asked which panel you wish to display. In this example, there is only one panel and one database link. The selection dialog appears with this link selected.
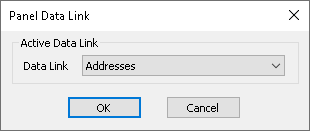
- Click OK to display the questionnaire with the panel data included.
-
To see how it will look when printed, select Print preview
 .
.
- If you are happy with your questionnaire, you can now print it. Select the All Filtered Cases radio button and click Print. If you need to make any changes select Cancel in the Print dialog. You must print from Data View mode to include the imported panel data. If you print from anywhere else, you will print out the empty questionnaire.
If there is a topic you would like a worksheet on, email to snapideas@snapsurveys.com