Word cloud appearance
You can change the way your word cloud looks by selecting a different style, or by adjusting the style using the Cloud style dialog.
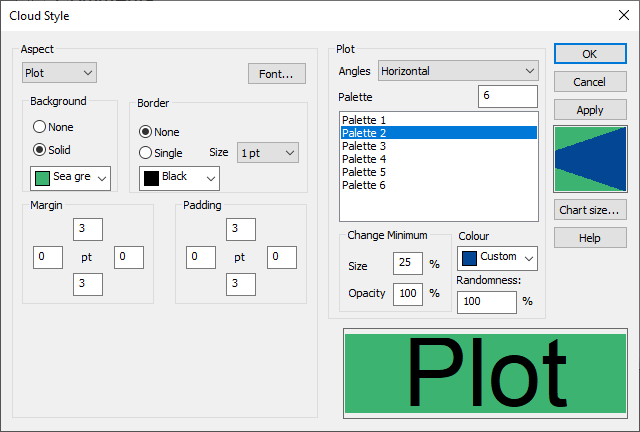
- To adjust the style, right-click or press F2 in a cloud window and select Edit Style from the context menu. The Cloud Style dialog opens. By default it will show the Plot aspect. This will look slightly different if you have created your cloud from a cross-tab.
- Click the Font button to change the font used in your word cloud.
- Select Solid and then a background color if you wish your word cloud to appear on a colored background. The font and background are previewed at the bottom right of the dialog.
- Change the Angles to switch the words in your cloud from being written horizontally to vertically.
- Change Randomness to change the way that words are laid out in the word cloud. A high value will give slightly rounder look.
Changing color size and opacity of the words in your cloud
The colors in your word cloud will vary between the colors selected in the palette.
- Change the value in Palette to change the number of different ranges used in your word cloud. The colors used for words in the cloud graduate between the colors in the palette. If you want the colours to be distinct, you will need to add a color for each code (or the number in the Limit codes field in your definition)
- The colors in the palette are listed (Palette1 to Palette6 in the dialog above). You can view and change a color in the palette by selecting it. Its current value can be seen and changed in the Colour list. (Custom in the dialog above).
The preview of the words in your cloud are shown on the right of the dialog.
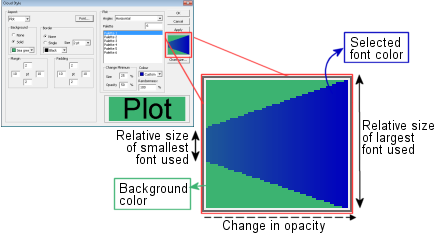
- Change the Size percentage to change the range of sizes in your word cloud. The size range is shown as the change in height of the colour area in the preview.
- Change the Opacity percentage to change the range of transparency in your word cloud. The opacity range is shown from left to right in the preview.
Change other aspects of the cloud
You can add a title to your cloud by selecting Title in the Aspect list.
You can add a backdrop to your cloud by selecting Backdrop in the Aspect list.
The Legend aspect only applies to cross-tabulation clouds.
Word cloud styles
You can load an existing style by
- selecting its name in the Style field of the Analysis Definition dialog when you define your cloud.
- right-clicking or pressing F2 in the Analysis Display window with a cloud and select Load Style from the context menu.
You can browse for any cloud style file (.wcsf file). Styles provided with Snap are stored in the Styles sub-directory from the main Snap program folder.
Editing word cloud styles
Edit the way the cloud looks by using the Cloud Style dialog.
Saving word cloud styles
If you have altered the appearance of a cloud and want to store this new design for future use, press F2 or right-click and select the Save Style option.
The file name of the style used to create the original word cloud is used as the default in the Save Style As dialog box.
Change the name in the File Name field, leaving the .wcsf extension. Click OK to save the style.