Setting up paper questionnaires for distribution
Seeding your questionnaire before printing
If you have a question that asks for information from a respondent that you already have in a database or spreadsheet, you can pre-seed the questionnaire with this information before you send it out.
To do so, you must set up a database link. If you print the survey in Case Data view from the questionnaire window, you will print a personalised survey for each respondent. If you are also putting your survey online, respondents will see the pre-seeded data when they complete the survey.
Including a pre-printed ID code
If you are producing a printed questionnaire for known respondents, you can insert a unique ID code on the questionnaire to identify respondents. You can then seed data into the survey without requiring your respondents to enter it in the questionnaire.
Once the respondents have completed and returned the questionnaire, the cases can be matched with records from an external database for importing other personal information. This assumes that the database has a unique ID for each respondent.
To set up the questionnaire for a mail merge you must:
- Create an open-ended question for the ID
- Create hidden questions for any data you wish to import from the database when the surveys are returned
- Create a link to the database holding your respondents’ data
- Select the link in Panel data in Data Entry mode and print the questionnaire
Adding the space for the respondent’s ID
- Open the survey in Design mode and create a new Open Ended question below the subtitle (set the response to Quantity or Literal depending on the format of the ID).
- Type “ID:” in the area marked “Click here for text”.
- Use Ctrl++ to expand the response box until it is large enough for your address lines.
- Select Alignment in the toolbar topics and then select Data and Center in the drop down lists so the imported ID will be clear of the box edges.
- Select Show from the toolbar topics drop-down list and uncheck the box for Name to hide the question number.
Create the questions for the data you wish to import
- Go to the top of the questionnaire (above the title) and create a new Open Ended question.
- Click the Properties button
 and change the question Name property to something that identifies the data you will want to import (eg “Address_1”). Change the data length to the size required and click OK
 - Repeat to create variables for other details you wish to import from your database. For example Name, Town, Post_zip_code. Note that no spaces can be used in variable names.
- Select all your new questions. Select Show from the toolbar topics drop-down list and uncheck the box for All to hide the questions.
- Click
 to save your changes.
Connect to your database of respondents
- Select File | Database Link to display the Database Linkage dialog and click New.
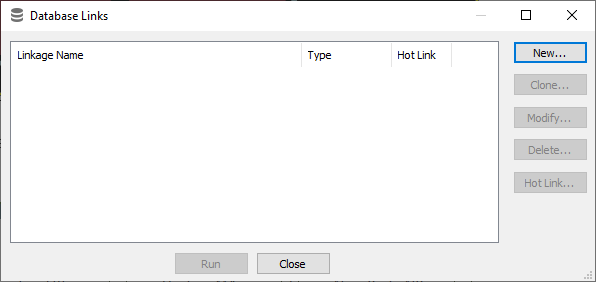
- The Database Linkage Wizard dialog is displayed. Select the Import from database option and click Next>.
- Click Select Database File and browse to the file containing the respondent data. (If the file is of an unrecognised type, you can identify it to Snap using the Build Data Link… button.)
- Select the table to use and click Next>. (If you do not wish to import details for all the respondents in the file, you can set a filter here.)
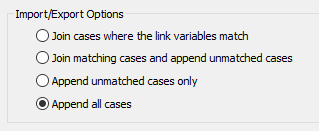
- The dialog displays a list of Import/Export Options. Select Append all cases. This option imports new cases from the database and appends them to the existing cases in the database. If you already have cases in your survey, you could select a different option so identical cases were not imported.
- The next dialog allows you to map the fields in the database to the fields in the questionnaire. Select the database field for the ID in the left-hand column and your ID variable in the right-hand column. Click Next

- A summary of your database link will be displayed. Change the name of the link to Printing and click Finish.
- Click Close to close the Database linkage window.
Printing the questionnaires with the customer ID
- Change to Data View mode by clicking
 on the questionnaire window toolbar, or pressing Ctrl + Shift + D.
 - Select Panel Data (to show the information you have just added from the database) from the dropdown list. Select the Printing database link.
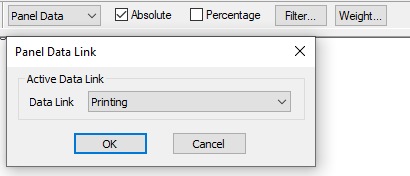
- Click OK to display the questionnaire with the ID data included.
- Click the Print preview button
 .
. - If you are happy with your questionnaire, select the All Filtered Cases radio button and click Print.
You must print from Data View mode to include the imported panel data. If you print or publish from anywhere else, you will simply print out the empty questionnaire.
If you are printing a questionnaire for scanning, you must print the code boxes. Select Tailor| Questionnaire Design to open the Questionnaire Design Tailoring dialog. Clear the Hide boxes with data option. The box outlines will then be shown on the printed sheet.