Setting up panel exit pages
If you are using a bought-in panel of participants, the panel provider may require a participant ID to be passed into the survey, and subsequently passed back out along with a completion status. This allows the panel provider to track if a participant has completed the survey, been screened out, or if they were over quota. They collect this information by sending the participant to a webpage that captures their exit status and ID when they leave the survey.
Snap XMP allows you to direct participants to a specific web address at the end of the survey. It also enables you to set a web address for screen outs and when a quota is full, using the new screen out and quota feature built into the software. This worksheet describes how to send the respondent to the relevant webpage and to include the participant ID and completion status.
In this tutorial, the following exit pages are used:
- Screen out: https://www.example.com/panel?status=screenout&ID=
- Quota Full: https://www.example.com/panel?status=quotafull&ID=
- Complete: https://www.example.com/panel?status=complete&ID=
The participant ID must be added to the end of each URL to send the participant ID back to the panel provider. This enables them to be able to track which participants have completed the survey, and those that have failed to qualify.
Step 1: Including a participant ID
For the panel to identify which participants were completed, screened out or over quota, an ID must be assigned for each participant. This ID must be available in the survey for it to be used in the exit URL.
- Create an open-ended literal variable at the top of the survey, that will be used to collect the participant ID.
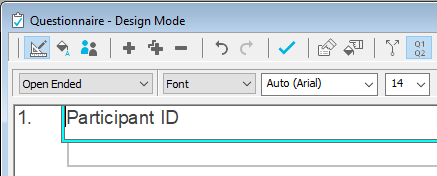
- It’s recommended to rename the variable, to avoid any confusion, as currently it will be called Question 1. To rename, right click on the variable and select Variable Properties. Then change the Name to something like ID.
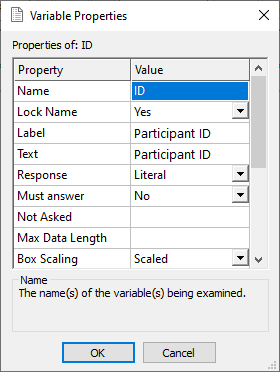
- Press OK to confirm the change.
- You can then hide this variable, so that your respondents don’t see it in the survey (but this will still allow the data to be passed into the variable, and back out again). To hide the variable right click on it and select Hide Variable. If you have multiple editions in the survey, you will also need to hide the variable in all the editions.
Step 2: Creating the screen out and quota full exit link
These steps assume that you have already created your Quotas and Screen outs. If you require information on when to use these, please see our Introduction to quotas and screen outs for a general overview. To learn how to create a Quota, please see Setting up quotas. To learn how to create Screen Outs, please see Setting up screen outs.
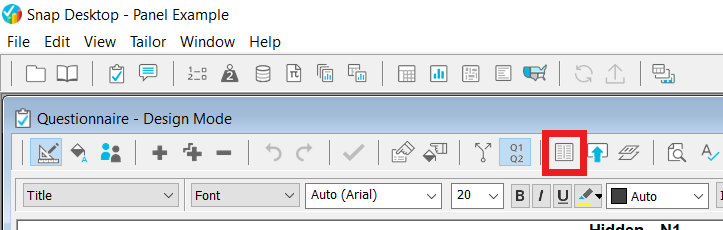
- Open the survey in Snap XMP Desktop.
- Select View then Quotas and Screen Outs from the menu.
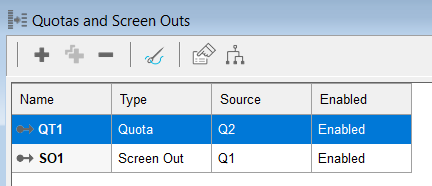
- In this example, there is one quota and one screen out. Each one will have the URL link set to the web page that is shown when the quota or screen out is triggered. This example starts by setting the quota’s exit URL. Double-click on the quota to open it.
- Select the URL option and enter the quota full URL provided by the panel.
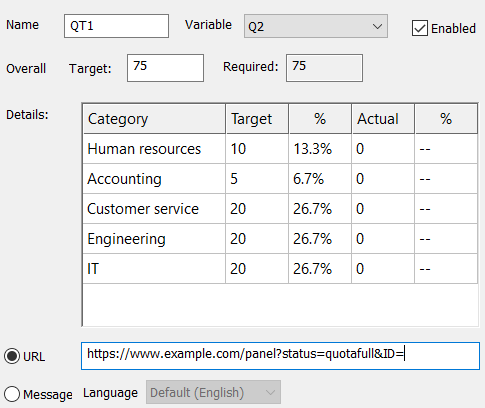
- Add the name of the variable that collects the participant ID. In step 1 we named this variable ID, so enter the name of the variable in curly brackets onto the end of the URL, e.g. {ID}. The curly brackets act as a placeholder for the participant ID. The data from the variable is inserted onto the end of the URL.

- Press OK to confirm the change.
- Double click on the screen out to open it.
- Select URL and enter the screen out URL provided by the panel.
- Add the name of the participant ID variable in curly brackets onto the end of the URL, e.g. {ID}.
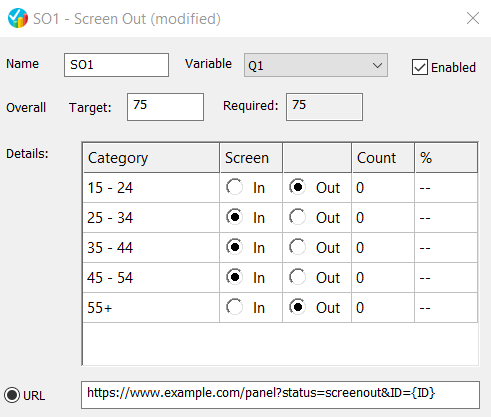
- Press OK to confirm the change. Both the quota full and screen out exit links are now set up. If you have any additional quotas or screen outs, then repeat the steps above to apply the URL to each of them.
Step 3: Setting up the complete link
Now that the quota full and screen out exit links have been created, you can now set up the on submit exit URL, for those respondents that successfully complete the whole survey.
- Open the Questionnaire Properties menu.
- Click on the Submit tab from the left-hand menu.
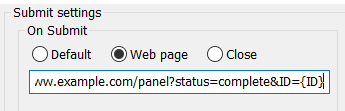
- Select Web Page for the on submit option and enter in the complete exit link.
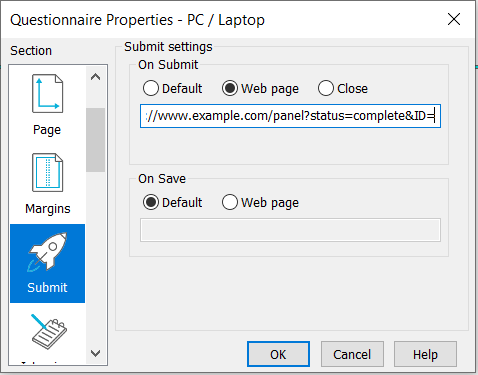
- On the end of the URL enter the name of the variable that contains the participant ID in curly brackets. In this example the variable is called ID, so add {ID} onto the end of the URL.
- Press OK to confirm the change, then save the survey and upload the changes to your Snap Online account.
Step 4: Passing the participant ID into the survey
Once you have set up all the exit links for the survey, you are ready to test them with the panel company. First, you need to create the entry URL that the panel can use to add the participant ID onto the end, before providing it to each participant.
- Login to your Snap Online account.
- Click on the survey to select it.
- Select the Collect tab
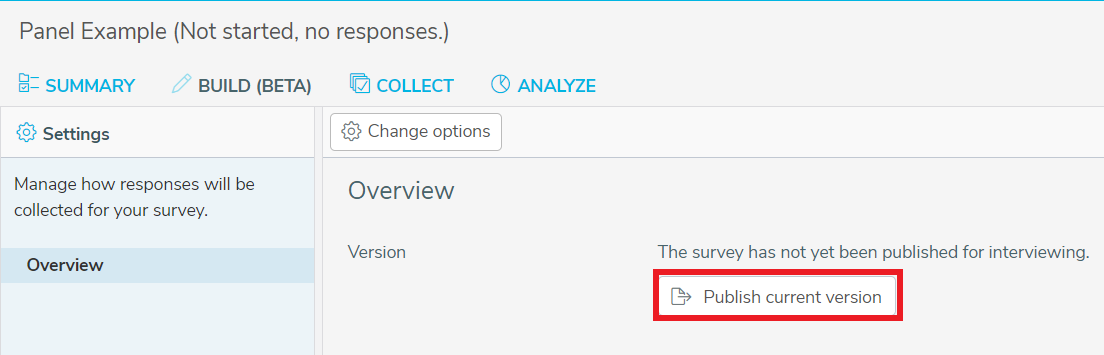
- Publish the survey, if you have not done so already, to create the survey URL.
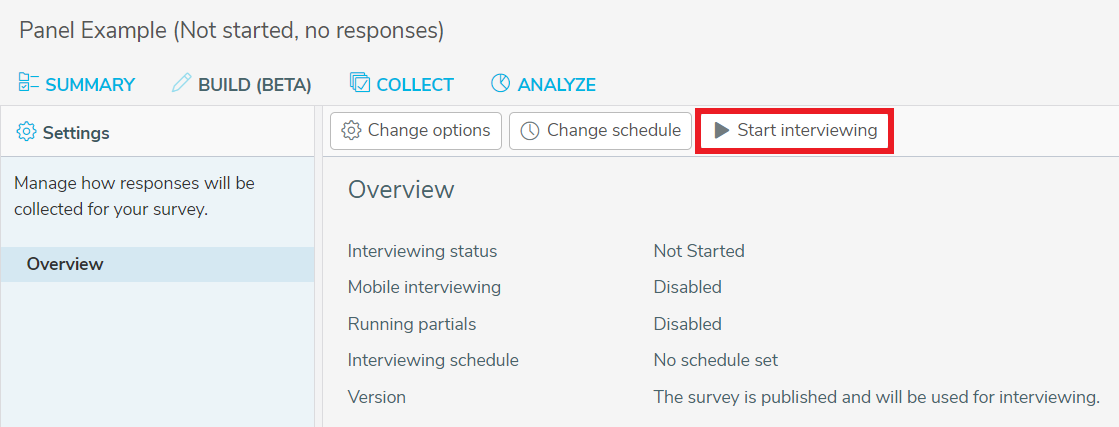
- Then start the interviewing to make the survey live.
- Use the Copy button to copy the live URL for the survey.

- Paste this URL into a text editor such as Notepad.
- You can then seed the participant ID into the survey via the URL. This is added as ?<variable name> = . In this example our variable name is ID, so my URL would be: https://online1.snapsurveys.com/tqxm2r?ID=

- You can then pass this URL to the panel company. They will add each participant ID onto the end of the URL, before providing the participant with the link. For example, if the participant ID is ABC123, the link provided to that participant would be:
- https://online1.snapsurveys.com/tqxm2r?ID=ABC123
This now completes the setup of a panel survey. The ID of the participant will be passed into the survey via the seeding on the entry URL for the survey. This passes a participant ID into the ID variable created in the survey. This is then passed out to the exit link, with the seeding that is set up for the Complete, Quota Full or Screen Out URL.