Setting up filters for Snap XMP Online analysis
This tutorial shows how to filter your survey’s analyses and reports on Snap XMP Online. These allow you and your shared users to quickly filter the data used in the analyses and reports. It also covers how to hide reports and analyses so they cannot be seen on Snap XMP Online. This is only available for online surveys created in Snap XMP Desktop.
Step 1: Creating the filters to use in Snap XMP Online
The external filters and contexts are defined from the Analyses or Reports windows. Once defined, the filter or context can be applied to reports and analyses in Snap XMP Desktop and Snap XMP Online.
- Click Analyses
 or Reports
  on the Snap XMP Desktop toolbar.
 -
Click on Define External Filter/Context
 . This opens the Define External Filter/Context dialog.
- Select the Filter tab to enter a filter or the Context tab to enter a context.
- Click Add to add a new filter or context variable to the list. Select from the list of variables in the selected survey and click OK.
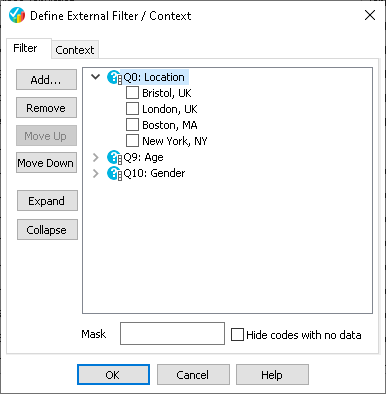
- Use Move Up and Move Down to change the order of the list.
- Click OK to save the filters.
Step 2: Checking the filter in Snap XMP Desktop
External filters or contexts allow you to filter the cases used in an analysis or report without changing the analysis or report definition. This is useful for testing the filters available in Snap XMP Online.
- Click Analyses
 on the Snap XMP Desktop toolbar.
 - Double click on an analysis to display it in the Analysis Display dialog.
-
Click on Apply External Filter/Context
 . This opens the Apply External Filter/Context dialog. If this is disabled, then select Allow additional filters on the Analysis Definition dialog.
- In the Apply External Filter/Context dialog, select the Filter or Context tab.
- Select the code(s) in the selected variable(s) in the list to apply a filter or context. In this example, the location Bristol UK is selected.
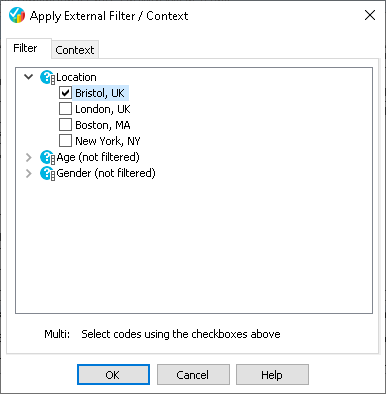
- If you have applied a mask to the filter, the filter codes displayed will depend on the mask settings.
- Click OK to apply the filters to the analysis. This will show the data responses filtered for the Bristol location.
Step 3: Using the filters in Snap XMP Online
Any analyses or reports that include external filters can use these to view a filtered subset of the response data. To apply a filter to an analyses, use the following instructions:
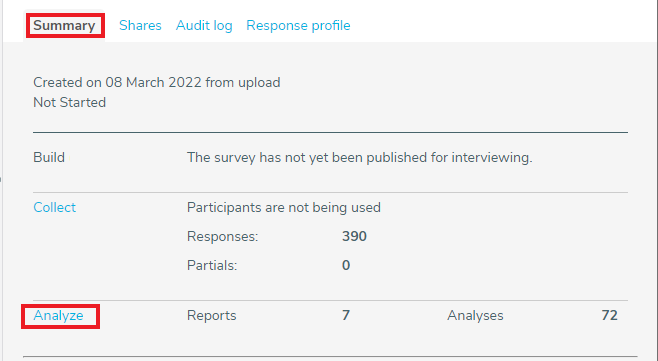
- In Snap XMP Online, select the survey from Your work.
- In the Summary tab, click the Analyze link. The reports and analyses are available here.
- Select Tables and Charts in the side menu then select the analysis you want to view.
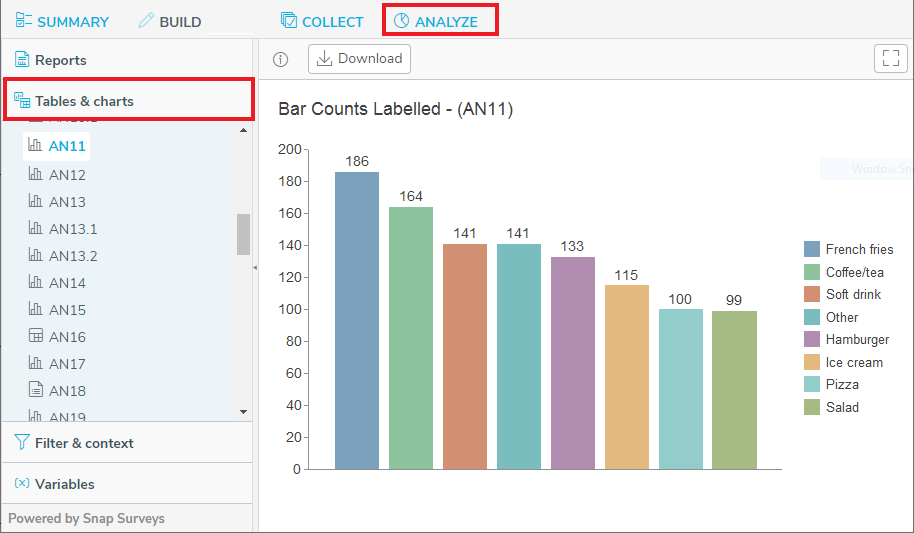
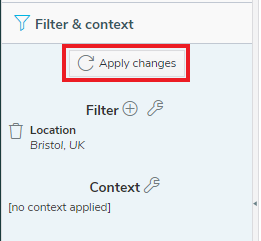
- To apply a filter to the selected table or chart, select Filter & context in the side menu.
-
Click Add variable
 to add a filter rule.
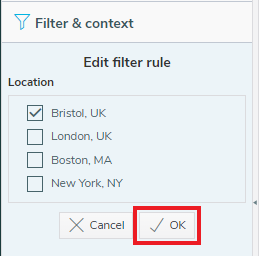
- In the Select a variable list, select a variable to use as the filter then click Next.
- Select the answers to use in the filter and click OK.
- Click Apply changes to update the analysis of your response data for the selected filter.
Turning external filters on and off in Snap XMP Desktop
Settings in the analyses can determine whether other users can apply the external filters to an analysis in Snap XMP Online by using settings in Snap XMP Desktop. You can also control whether they can see an individual analysis.
- In Snap XMP Desktop, open your survey and click Analyses
 to open the Analyses window.
 -
Open the analysis that you want to control and click Properties
 on the Analysis Display toolbar to display the analysis definition.
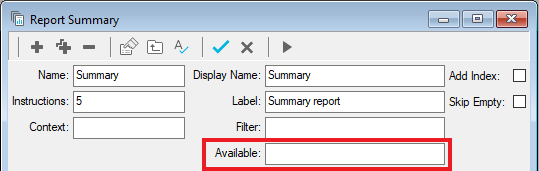
- In the Definition tab, select Allow additional filters to enable filters for this analysis in Snap XMP Online. (Clear this to disable external filters in Snap XMP Online.)

- Check that the Available field is clear or says Yes. (Enter No in this field to stop the analysis being available in Snap XMP Online. Enter a condition in this field to allow the analysis to be available in Snap XMP Online if the condition is true.)
You can set Available conditions on reports in the report definition.
If there is a topic you would like a tutorial on, email to snapideas@snapsurveys.com