Routing
In your questionnaire you often want to ask certain questions to specific groups of respondents rather than all respondents. This is usually based on the answers they have already selected in previous questions.
Question routing sets up the questionnaire so respondents are only asked questions relevant to them during completion. Questions that are not relevant to them are skipped. You can set up the routing rules in the Routing side menu in the Build side menu in the Online Designer.

There are three types of routing rules that can be used in a Snap XMP Online questionnaire.
- Ask this question if – the question is only asked if a specific answer or answers have been given to a previous question.
- After this choice go to – this will forward the respondent onto the next relevant question regardless of the answer given.
- After this question go to – the next question that is asked is dependent on the answer selected.
Ask this question if routing
Questions with this type of routing are only asked if a specific answer or answers have been given to a previous question. Before this question is asked, Snap XMP Online checks that the routing conditions are met. If the conditions are met the question is asked, otherwise it is skipped.
There are 3 restrictions for this type of routing
- only one such rule is allowed per question
- the rule can reference more than one question
- the rule can only reference previously asked questions on the questionnaire
Steps to follow when setting up the routing are
- Select Routing in the side menu. This is underneath the Insert question menu.
- Select the
 icon on the Ask this question if item.
 - This shows a Manage pre-condition routing window where you can enter the routing relationships.
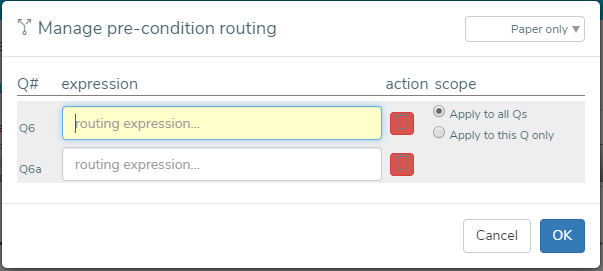
- There is an expression entry for every section or row in the question. In this example, Q6 is the Multiple Choice section and Q6a is the Other response section.
- Add a routing expression for the question. Further details on routing rules can be found in Routing rules expressions.
- Click OK to save the routing.
| Fields | Description |
| Expression | This is the condition that needs to be satisfied for the question to be asked. More details on expression are given in Routing Rule Expressions. |
| Action | You can click the bin icon to delete the routing on the question shown in the same row. |
| Scope | The scope selects whether the expression will apply to all questions in the dialog list or only the current selection. |
| Display settings | This drop down shows a list of options for hiding or displaying the routing on your questionnaire. |
| OK | Click OK to save the routing. |
| Cancel | Click Cancel to cancel any changes made. |
After this choice go to routing
This routing will direct a respondent to the next relevant question within the questionnaire irrespective of the answer given in the current question.
This type of routing is available for Multiple Choice, Single Choice and Drop down questions. This routing is usually used with single response questions. If a multiple response question has “After this choice go to” routing on several codes going to different question numbers, then the routing will go to the question furthest down the questionnaire.
Steps to follow when setting up the routing are
- Select Routing in the side menu. This is underneath the Insert question menu.
- Select the icon on the “After this choice go to” routing item.
- This shows a Manage go-to routing window where you can enter the routing relationships
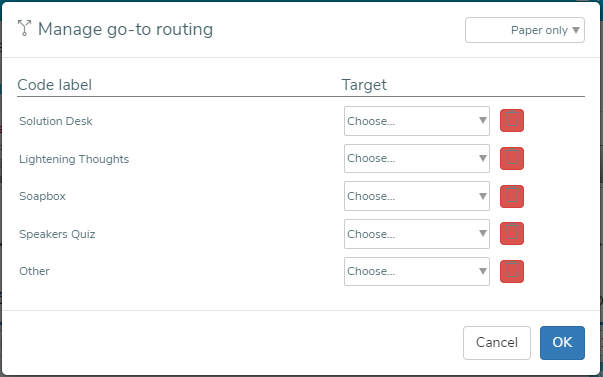
- The Target drop down contains the list of available target question. Select the target question from the drop down list. The target question will be the next question when the corresponding answer is selected.
- Click OK to save the changes.
| Fields | Description |
| Code label | The code labels from the selected question |
| Target | This is a list of all the questions that are after the selected question. This list also includes titles and the end of the questionnaire. You can choose the question you would like to go to when this answer is selected. |
| Display settings | This drop down shows a list of options for hiding or displaying the routing on your questionnaire. |
| Bin Icon | You can click this icon to delete the routing on the code label in the same row. |
| OK | Click OK to save the routing. |
| Cancel | Click Cancel to cancel any changes made. |
After this question go to routing
This will forward the respondent onto the next relevant question in the questionnaire depending on the answer they select.
Steps to follow when setting up the routing are
- Select Routing in the side menu. This is underneath the Insert question menu.
- Select the icon on the “After this question go to” routing item.
- This shows a Manage post-condition routing window where you can enter the routing relationships
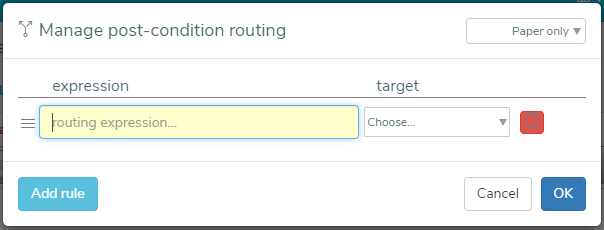
- Add a routing expression for the question. Further details on routing rules can be found in Routing rules expressions.
- Select the target question from the list available.
- Click Add rule if you need more than one post-condition rule. Then repeat steps 4 and 5 to add the routing.
- Click OK to save the routing changes.
| Fields | Description |
| Expression | This is the condition that needs to be satisfied in order to go to the target question. More details on expression are given in Routing Rule Expressions. |
| Target | This is a list of all the questions that are after the selected question. This list also includes titles and the end of the questionnaire. You can choose the question you would like to go to when this expression is satisfied. |
| Display settings | This drop down shows a list of options for hiding or displaying the routing on your questionnaire. |
| Bin Icon | You can click the bin icon to delete the routing on the question shown in the same row. |
| Add rule | You can have more than one post-condition routing expression. You can click the Add Rule button to add another expression row. |
| OK | Click OK to save the routing. |
| Cancel | Click Cancel to cancel any changes made. |
Showing Routing
Routing can be hidden or displayed in the questionnaire when it is used for interviewing or printed on paper. This setting is in all the Manage routing dialogs which appear after clicking the ![]() routing icon.
routing icon.

The 3 options available are:
- Paper only – routing is shown on paper questionnaires, but not other publication methods.
- Always show – routing is always displayed on the questionnaire in all publication methods.
- Never show – routing is not shown on the questionnaire in any form of publication method.
If questions are moved around after routing rules have been set up, the routing will automatically be updated with the new question numbers.
Viewing the question relationships
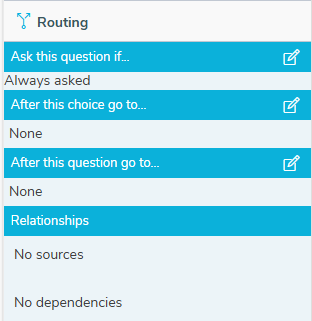
The Routing side menu shows the routing rules and relationships that have been applied to the selected question.
The Routing menu shown below has no routing applied and is the default when adding a question into a questionnaire.
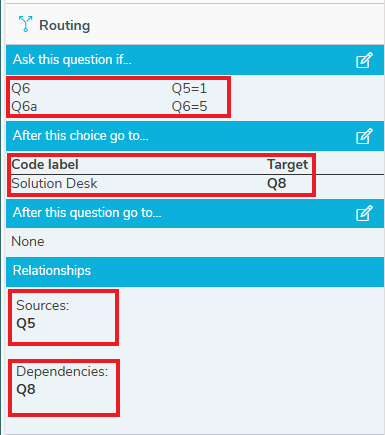
The following menu has some routing applied. In each section of routing you can see the routing expressions that are applied on the selected question, which is Q6 in this example.
The question has
- Ask this question if routing on Q6 which uses the answer for Q5. Q5 is listed as a Source in the Relationships section.
- Ask this question if routing on Q6a which is shown when the Other response is chosen
- After this choice go to routing where the target is Q8 when the Solution Desk answer is selected. Q8 is listed in Dependencies in the Relationships section.