RIM weighting
RIM weighting is used when you wish to provide weighting for more than one variable to achieve an even distribution of results across an entire dataset.
It can also be used to produce an analysis in which the proportion of respondents in your sample is adjusted to match more closely to the proportion in the target population.
For example, if you wished to weight your samples so that they were 50% male and 50% female, and also 20% in each of five age brackets, the algorithm would calculate the correct weighting that needed to be applied to each table entry (combining age and gender).
RIM weighting works best for single response variables where there is no missing data, and the counts or percentages are similar to the existing data responses.
It is not a good idea to use rim-weighting if:
- Your variables are related to each other (for example, income bracket and dwelling size).
- The values vary enormously (for example, you have 96 males and four females, and you are attempting to balance it to 50:50).
- You are applying a very large number of weights.
Creating a RIM Weight
- In the Survey Overview window, open the survey.
- Click Analysis Variables
 on the Snap XMP Desktop toolbar. This opens the Analysis Variables window which displays a list of the analysis variables.
 -
Click New Analysis Variables Item
 on the Analysis Variables toolbar. This displays a menu of analysis variables to choose from.
- Click New RIM Weight. This opens the RIM Weight window. Note there is an initial error in the status bar as there are no variables references yet.
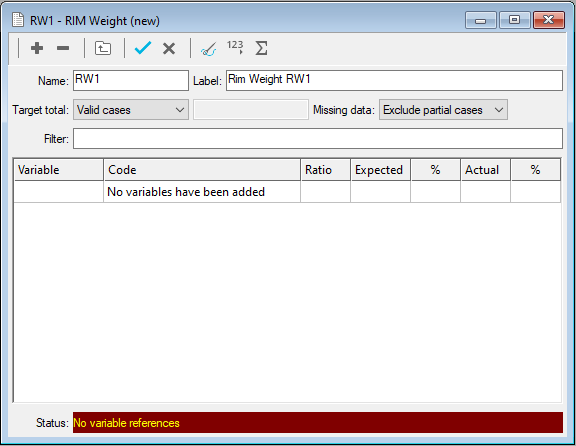
- In Name, enter a name which describes the RIM weight.
- In Label, enter a description of the RIM weight.
- In Target total, select the required option.
- In Missing data, there are two choices: exclude partial cases or include partial cases. Excluding the partial cases provides the most accurate result as the partial cases have missing data in their responses. The default is exclude partial cases.
- In Filter, enter a filter expression to create the RIM weight for a subset of the response data.
- Click Add Variable
 to open the Select variable dialog.

- Select a variable from the Name drop-down as the weighting variable.
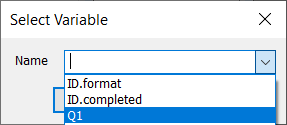
- Click OK. This displays default values for the RIM weight in the grid . The grid shows the ratio, expected count and percentage as well as the actual count and percentage.
- Click in the Ratio column to change the ratio or target number depending on the Target total option selected.
- Repeat for all the variables you wish to add.
- If you wish to remove variables, select a variable in the grid then click Delete Variable
 to delete the variable.
 - Click Save
 to save the RIM weight.
Target Totals
There are three options for setting the Target total: Valid cases, From targets and Custom.
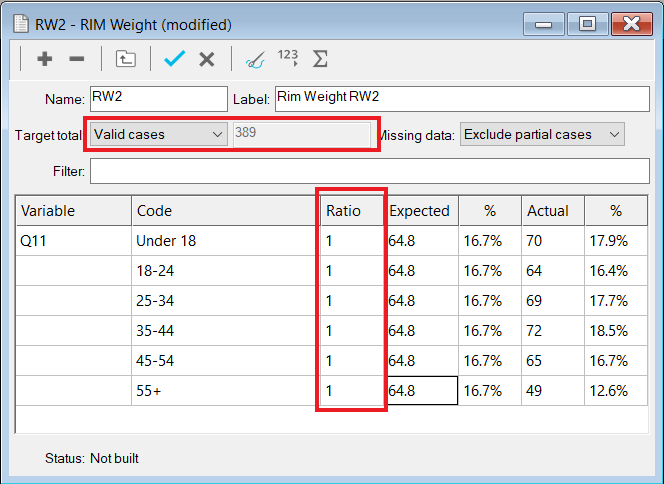
Valid cases
Valid cases bases the RIM weight on the valid data responses in the survey. The default ratio is 1 to give an equal distribution for all variable codes. The Ratio column can be changed with a proportion or target number for each variable code. For a target number to be used the total numbers in the Ratio column (per variable) must add up to the number of valid cases, otherwise a proportional ratio is used. The Expected column shows the target counts. The total number of valid cases is available next to the drop-down.
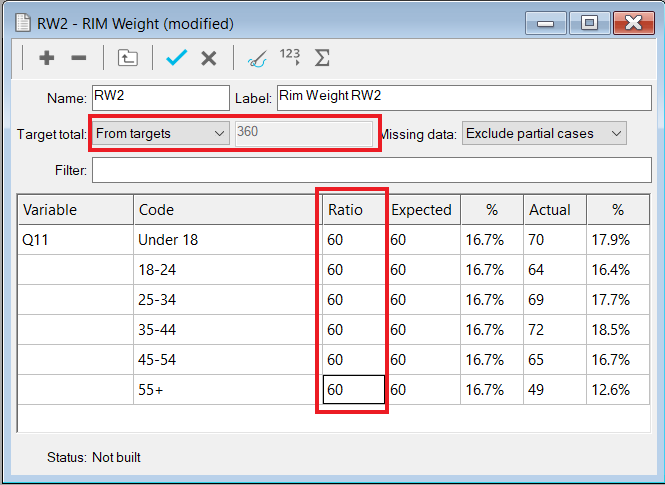
From targets
From targets sets a ratio or target number for each code within a variable. This is set in the Ratio column. The target number is available next to the drop down and is the count of the target number for each variable code in the Ratio column. The Expected column shows the target counts for each variable code.
Custom
Custom allows an overall target number to be entered. Selecting this option enables the field next to the drop-down where you can enter the target number. The default ratio is 1 which shows an equal distribution of the target number split across all the codes within each variable. The target number can be edited in the Ratio column. The Expected column shows the target counts for each variable code.
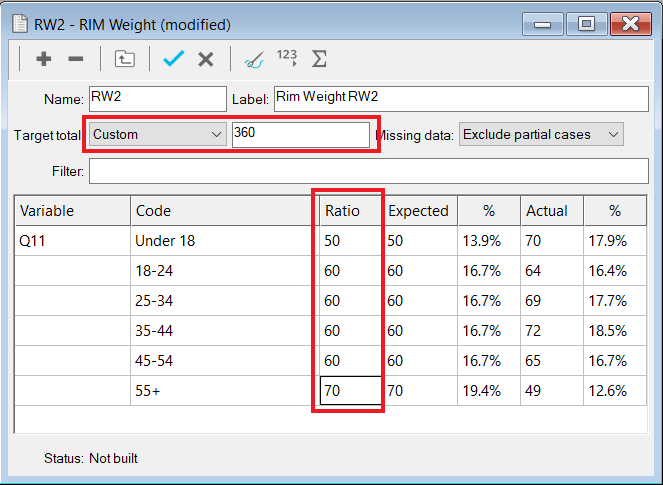
Note: The RIM weighting in Snap XMP Desktop works out whether the number entered in Ratio is a percentage, proportion or target number and does not require a percentage sign (%) to be entered.
Tailor the RIM Weight
You can customise the decimal places, maximum iterations and match threshold for the RIM weighting.
- Click Tailor
 on the RIM Weight toolbar where you can edit the number of decimal places, maximum iterations and match threshold for the RIM weighting calculation.
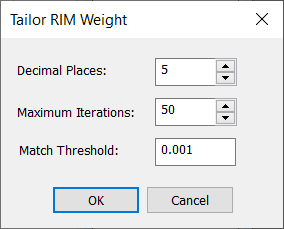
- Click OK to save.
Assess the RIM Weight
Assessing the RIM Weight gives statistics of how efficiently the RIM weight will meet the target.
- Click Assess RIM Weight
 on the RIM Weight toolbar to assess the RIM weight.
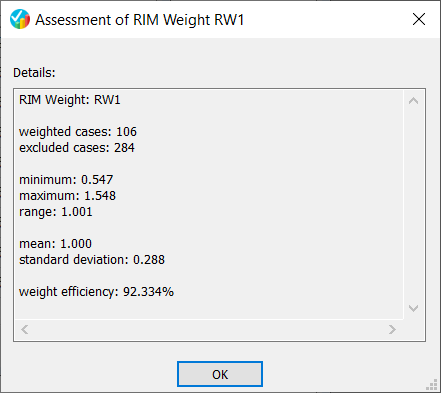
- A summary shows the build information. Click OK to close the summary.
Errors
If there is an error in the RIM weight the status bar will show an error message. Clicking Assess RIM Weight ![]() also shows an error message. For example, when not enough target values are set, the assessment shows an error message and the status also displays this message.
also shows an error message. For example, when not enough target values are set, the assessment shows an error message and the status also displays this message.

Build the RIM Weight
The status of the RIM Weight displays in the status bar at the bottom of the RIM Weight window. When the RIM Weight is created the status shows as Not built.
-
Click Build RIM Weight
 on the RIM Weight toolbar to build the RIM weight.
- The Status changes to show Built. If there is an error in the RIM weight the status bar will show an error message and the RIM weight is not built.
-
Click Save
 to save the RIM weight.
Using the RIM Weight
The RIM weight can be included when creating analyses.
- Click the required analysis icon on the Snap XMP Desktop toolbar. This opens the Analysis Definition window.
- In Analysis and Break, enter appropriate break and analysis fields.
- In Weight, enter the name of the RIM weight.
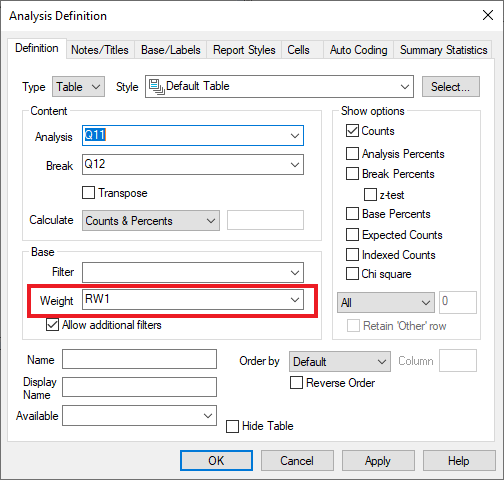
- Click OK to build the rim-weighted analysis.