Multi-factor authentication (MFA)
Please upgrade to Snap XMP Desktop version 12.11 or later to enable MFA support.
Multi-factor authentication is a security measure for online software. In addition to your username and password, this requires you to authenticate your login by providing additional information that proves your identity. This is usually provided by a code generated in an email or in an authenticator app. This makes your account more secure as it requires multiple pieces of information to log on with.
Multi-factor authentication is often abbreviated to MFA and is used in the rest of this article.
Configure MFA
You configure the MFA in Snap XMP Online.
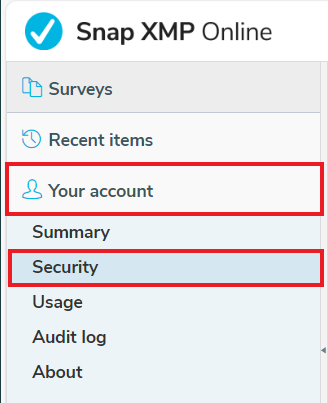
- To set up MFA on your account log in to Snap XMP Online.
- Select Your account in the side menu.
- Select Security.
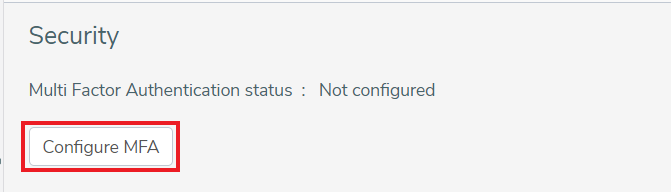
- In the Security tab, click the Configure MFA button.
- There are 3 options available: None, Email or Authenticator app. You can choose either Email or an Authenticator app to receive the 6-digit verification code. Examples of authenticator apps are Microsoft Authenticator or Google Authenticator. Select None to turn off MFA.
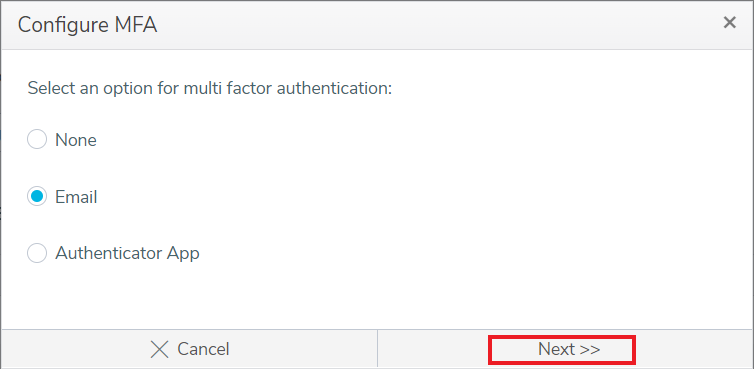
- Click Next.
- The next action depends on the option selected.
- None – the MFA settings are cleared. Additional information will not be requested when you log in.
- Email – an email will be sent to the email address associated with the logged in account with the 6-digit code. Enter the code and click OK.
- Authenticator app – follow the instructions on the dialog to set this up. Enter the 6-digit code and click OK.
- When the multi-factor authentication is set up you will be prompted for the code when you next log in.
Log in using MFA
Snap XMP Online
- When you next log in, enter your username and password as usual and click Log in.
- Snap XMP Online prompts you for a code. Enter the 6-digit code from email or the authenticator app.
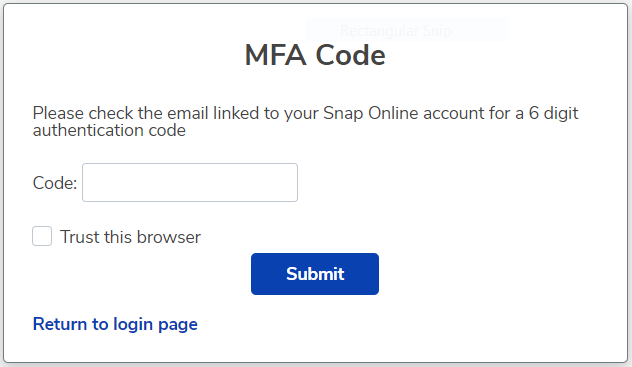
- If you wish to set your current device as a trusted device, select Remember browser. You will not need to enter the code each time you log in using the same browser on your device. If you use a different device or browser, you will need to enter the code.
- Click Submit to log in to Snap XMP Online.
Snap XMP Desktop
Once you have set up MFA in Snap XMP Online, the next time you use Snap XMP Desktop you will need to enter a code. Make sure you are using Snap XMP Desktop 12.11 or later for MFA support.
- Open Snap XMP Desktop.
- The message ‘Could not validate account’ appears. Click OK to remove the message.
- Enter the password for the user account shown.
- Snap XMP Desktop prompts you for a code. Enter the 6-digit code from email or the authenticator app.
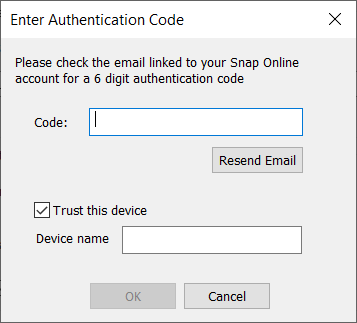
- If you wish to set your current device as a trusted device, select Trust this device. You will not need to enter the code each time you log in on the same device. If you use a different device or browser, you will need to enter the code.
- Click OK to log in to Snap XMP Online.
Change the type of MFA
You change the MFA settings in Snap XMP Online.
- Log in to Snap XMP Online.
- Select Your account in the side menu.
- Select Security.
- In the Security tab, click the Configure MFA button.
- You can choose either Email or an Authenticator app to receive the 6-digit verification code. Examples of authenticator apps are Microsoft Authenticator or Google Authenticator.
- Click Next.
- The next action depends on the option selected.
- Email – an email will be sent to the email address associated with the logged in account with the 6-digit code. Enter the code and click OK.
- Authenticator app – follow the instructions on the dialog to set this up. Enter the 6-digit code and click OK.
- When you next log in, enter the 6-digit code when prompted.
Clear the MFA settings
You can clear the MFA settings in Snap XMP Online, when you no longer require multi-factor authentication.
- Log in to Snap XMP Online.
- Select Your account in the side menu.
- Select Security.
- In the Security tab, click the Configure MFA button.
- There are 3 options available: None, Email or Authenticator app. Select None to clear the MFA settings.
- Click Next which clears the MFA settings. When you log in, you do not need to enter any additional information.