Introduction to the Questionnaire window
Questionnaire design is carried out in the Questionnaire window.
Here you can
- add items questions or notes to create your questionnaire
- style the way individual questions appear
- change how the whole questionnaire looks
- add other items such as video or audio
- specify how the questions are asked by including routing
- specify valid answers by using patterns and validation
- set which editions to publish
Choosing the questionnaire mode
The Questionnaire window has three modes to help create your questionnaire.
![]() Design mode
Design mode
This is the mode you work in when setting up the questionnaire. The Design mode is the default mode selected when the questionnaire window opens. Design mode allows you to specify
- the questions to be asked
- formatting individual questions
- the order in which they will be asked
- the type of response expected
- the overall layout of the questionnaire
![]() Style mode
Style mode
Style mode allows you to format the questionnaire in the same way as Design mode, but is used to make modifications to larger parts of the questionnaire.
Style mode allows you to
- change styles
- rename styles
- create new styles
When changing styles, you can
- only modify the selected style
- modify all styles related to the selected style
- modify every style (all questions) within the questionnaire
![]() Data View mode
Data View mode
Data View mode allows you to view the current responses to the survey displayed in the questionnaire layout. You can print individual cases, or see a summary of all cases.
Questionnaire window toolbar
The Questionnaire window allows you to specify the layout and structure of your questionnaire.
The Questionnaire buttons and menu options are shown in the table.
| Button | Menu option | Alternative | Description |
| Selected in Design mode. | |||
| Ctrl + M | Switch to Style mode. | ||
| Ctrl + Shift + D | Switch to Data View mode. | ||
| Edit | New | Ctrl + N | Create a new question. The name of the question must be unique within a survey. Digits and stops are allowed, e.g. Q1, Q1.1, Q1a | |
| Edit | Clone | Ctrl + O | Clone the existing question definition to a new question of a different name. | |
| Edit | Delete | Delete | Delete the current question. | |
| Edit | Undo | Ctrl + Z | Undo the last action. | |
| Edit | Redo | Redo the last action. | ||
| File | Save | Save the questionnaire but do not close the Questionnaire window. Only active once changes have been made. | ||
| Opens the Variable Properties dialog. Property values for the selected variable are changed here. | |||
| Opens the Style Picker dialog to select a style to apply to a question. | |||
| Opens the Routing Rules dialog box. Different routing rules can be created here. | |||
| Renumber the questionnaire. Double-click to switch on auto-renumbering. Single-click to return to manual mode. | |||
| File | Page Setup | Questionnaire Properties. Options available depend on the edition of the questionnaire. | ||
| File | Editions | Editions and Style Templates assigns a Format or Language or saves a template of the current questionnaire layout. | ||
| File |Print Report | Ctrl + P | Produce a print preview of the questionnaire with the option to print a copy. | |
| Edit | Spell check | F9 | Spell checks the questionnaire. | |
| Zoom in or out to change the size of the questionnaire on the screen. | |||
| Define scanning. This button is only displayed if the scanning module is installed and a scanning questionnaire is being designed. |
Saving the questionnaire
The results of your questionnaire design are held in the Questionnaire window, and the ![]() button can be used at any time to save the questionnaire.
button can be used at any time to save the questionnaire.
- Click the
 button or select the File|Save menu to save any changes to the questionnaire
 - Close the Questionnaire window by clicking on
 in the top right corner of the window. Prior to closing you will be asked if you wish to save the changes to the questionnaire.
Alternatively, if you have made changes to your questionnaire and would like to make a copy, rather than over-writing the original, you can select File | Save As to save the altered version of your questionnaire.
Zoom
The displayed size of the questionnaire can be changed by using the Zoom button ![]() on the Questionnaire toolbar. This only affects the appearance on the screen; it does not alter the look of the questionnaire when printed. The Zoom setting is stored when the Questionnaire window is closed so it re-opens with the same zoom setting.
on the Questionnaire toolbar. This only affects the appearance on the screen; it does not alter the look of the questionnaire when printed. The Zoom setting is stored when the Questionnaire window is closed so it re-opens with the same zoom setting.
- Click the Zoom button
 on the toolbar and a drop-down list of options, from 25% up to 400%, is displayed.
 - Choose a larger value to zoom in to get a close-up view of your questionnaire.
- Choose a smaller value to zoom out to make more questions visible but at a reduced size.
- Alternatively you can type in any value between 25% and 400% to display the zoom setting you want.
Finding text in the questionnaire window
You can find text in the questionnaire window when you are in Design or Style mode.
- Select Find in the toolbar topics drop-down list.
- Type in the text that you want to look for in the empty box to the right of the toolbar topics drop-down list in the ribbon.

- Press Enter. The search starts from the current cursor position to the end of the questionnaire, highlighting the first example of the text being searched for.
- Press Enter again and it will search for the next example.
- At the end of the questionnaire, you are asked if you wish to continue the search from the beginning of the questionnaire.
Use the controls ![]() to find the next occurrence and
to find the next occurrence and ![]() to find the previous occurrence.
to find the previous occurrence.
The box containing the search text will store any previous searches in a drop-down list, so you can repeat searches without retyping the text. This list will be cleared when the Questionnaire window is closed.
Replacing text
- Select Edit|Find, Edit|Replace or click
 to open the Find/Replace dialog.
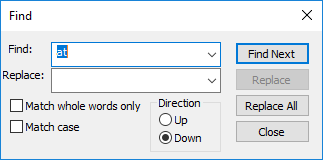
- Enter the text you would like to replace in the Find: field, and the text to replace it in the Replace: field. Note that you can use the Match whole words only and Match case check boxes to make your replacement more precise.
Spell checking your questionnaire
- With the Questionnaire window open, click
 to start a spell check. The spell check searches the entire questionnaire from the current editing position of the cursor.
 - If a word is found with a spelling mistake, it is displayed in the dialog box and a list of alternative spellings is provided.
- Click Ignore to leave a word unaltered.
- Click Ignore All to skip all occurrences of that word.
- Select Change to put the text in the Change to: box into the text of the questionnaire.
- Select Change All to change all occurrences of that word to the new spelling.
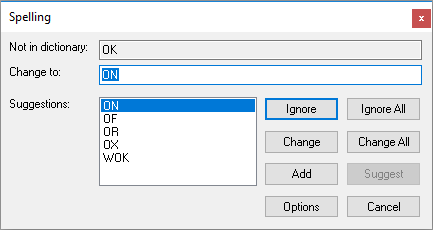
- At the end of the questionnaire, the spell check automatically restarts at the beginning and only stops when it has checked the entire questionnaire. It will then display a message showing the number of words checked and replaced.
- Click OK to return to the survey.
The default setting for spell checking is to ignore both numbers and partial numbers, so that numbers that appear in questionnaire, such as Q1, Q2A, 100, 1997 will be ignored. You can change these settings by clicking Options to open the Spell Checker Options dialog.