Introduction to patterns
Patterns are used to define the format of the data that a participant should enter when they are completing the questionnaire.
In data entry, patterns are used to
- Ensure that respondents or data entry personnel enter the correct format for information such as postcodes, zip codes or National Insurance numbers. Pattern matching is used to check whether the answer is a possible match in the pattern.
- Convert the data into a standard form, such as adding currency symbols in quantity data.
In filters and derived variables, you can
- Use the pre-defined patterns to temporarily change data, for example, converting literal responses to lower case
- Use one part of a pattern made up of several defined parts for example, the area code in a phone number, and use that part to analyse the data.
Snap XMP Desktop is supplied with a library of pre-defined Patterns. You can also create your own using the Patterns dialog from View|Patterns.
System patterns
Snap XMP Desktop is supplied with a library of pre-defined patterns that include patterns for:
- Literals such as email address, postcode and zip code
- Dates such as date in words
- Quantities such as currency and decimal number
- Components that can be used to build your own patterns, but cannot be used directly in variable details or as filters. For example letter or digit.
For each pattern there is
- A unique pattern name
- A form which identifies which types of variable can use the pattern
- A label describing how the pattern is used.
Applying a pattern in the questionnaire window
- Open the survey in the questionnaire window.
- Select a question, right-click and choose Variable Properties.
- Ensure you have the right Response selected for the question. Patterns are only available for open-ended questions, including date, time, literal, and quantity questions.
- Click the Source Pattern list to view the existing patterns for use with the variable.
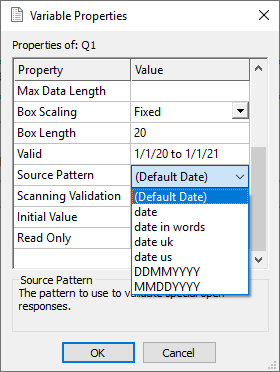
- If the pattern you were expecting to see is not showing you might need to change the Response type for the question. Only those patterns that are relevant to the response type are shown in the list of Source Patterns.
- Click OK to apply the pattern to the variable or Cancel to abandon any changes that you have made.
- Select
 in the Questionnaire window to save the Pattern and any other changes to the questionnaire.
Applying a pattern in the Variables window
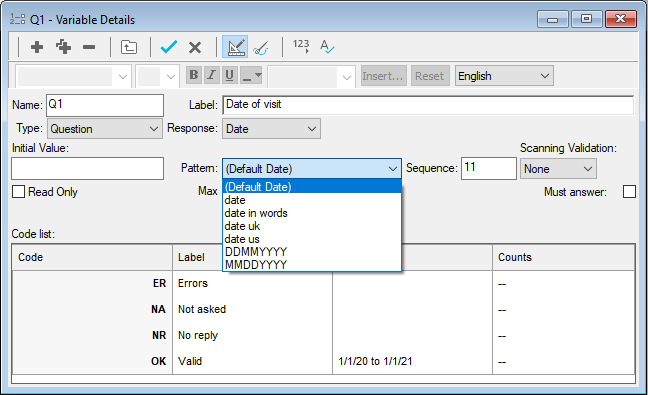
You can set the pattern for a variable using the Variable Details dialog.
- Click
 to open the Variable window.
 - Select the variable to which you wish to apply a Pattern and double click to open the Variable Details dialog.
- Click
 to toggle definitions of the variable and you will see that the Variable Details now display information including Pattern.
 - Click the Pattern drop-down and a list of patterns, applicable to the response type, is shown.
- Choose the required pattern and click
 to save the changes.
Patterns during data entry
There are two ways of using patterns in data entry.
- Check the data against the requirements. If it does not match, display an error message.
- Check the data against possible matches and change it to a standard format. If the data entered conforms to a number of entry options (for example, “two”, “2” or “£2”) included in the pattern the data is accepted then converted to a standard format (for example, all of the above responses are converted to “2” for analysis).
Composition of a pattern
Patterns are composed of components and matches.
- matches are text strings that a response must match
- components consist of one or more text strings that part of a response must match
Using components within matches means that:
- specific parts of a respondent’s answer can be identified and scrutinised at the analysis stage of the survey process
- a consistent style of result can be output and analysed
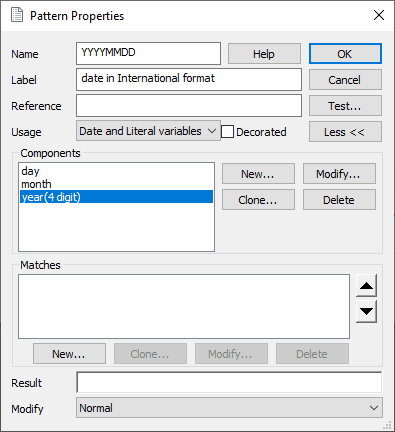
In the example below, the pattern has one match and four components.
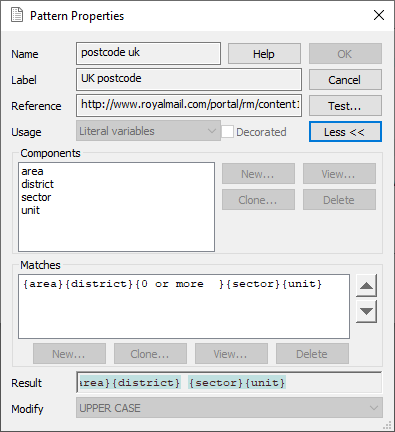
In addition to the text string used to match the response, you can add further details about the pattern.
- you can add data in the Reference field about where you accessed the information for the pattern; for example, a website address; a database or a reference book
- you can specify what type of response the pattern can be used within the Used In field (select Other Patterns Only for patterns that will only be used when creating another pattern)
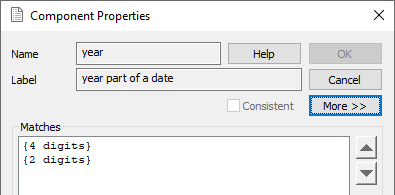
The example below shows two Matches for year; {4 digits} and {2 digits}, signifying that there can either be 4 digits or 2 digits representing the year part of the date.
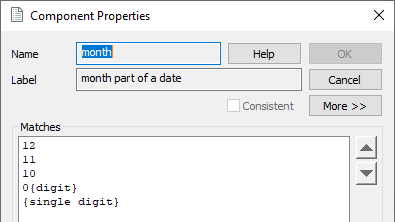
The Matches for the month component can be seen below. There are 5 matches within the component, signifying that either 12, 11 or 10 is acceptable or a zero followed by a digit, such as 05 or a single digit, such as 5 (to represent May).
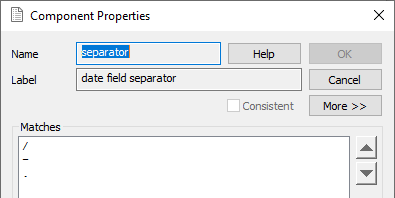
The separator component of this DD/MM/YYYY pattern has been set up to accept dashes, obliques and full stops as the divider between the various parts of the date.
Creating a new pattern example
This example shows how the DD/MM/YYYY pattern can be created. This ensures that the respondent enters a date with day-month-year format, where the year part can include a two-digit century.
The separator between day/month and month/year can be any of “/”, “-” or “.”.
All these are valid dates: 06/08/2020; 6-8-2003; 06.8.2020; 6/08/20 for this pattern.
Examples of invalid dates are: 6th August 2020; 06/Aug/2020.
- Select View | Patterns to open the Patterns dialog. (Prior to build 12.10 this was on the Tailor menu.)
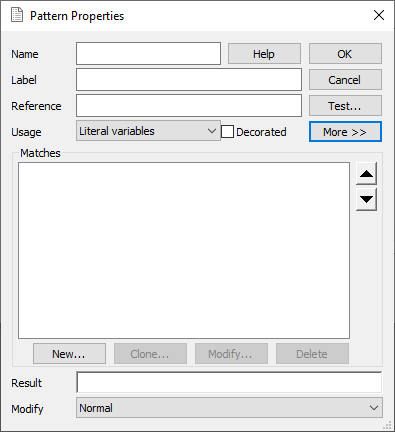
- Select New in the Patterns dialog to display the Pattern Properties dialog.
- Choose a name for the pattern and type it in to the Name box. Try to make the name as specific as possible to its purpose. For example, rather than write it as Date write it as DD/MM/YYYY so that its format can be identified easily by others using it.
- Enter a Label giving more information. This will be displayed when the pattern is selected on the front page of the Patterns dialog.
- You can enter a reference in the Reference giving specific details about where you accessed the information for the Pattern: for example, a website address; a database; a reference book.
- Select the response type that the pattern will be used with from the Usage drop-down list. Select Other Patterns Only for patterns that will not be available directly to variables, but only for use within other Patterns.
- You can create patterns by using a plain text string as a match, however, it is sometimes more effective to build the match up from components.
Creating components to use in your match
- Click More to display the Components part of the Pattern Properties dialog.
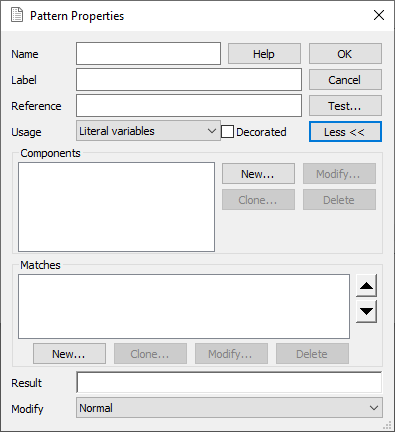
- Click New to the right of the Components area to display the Component Properties dialog.
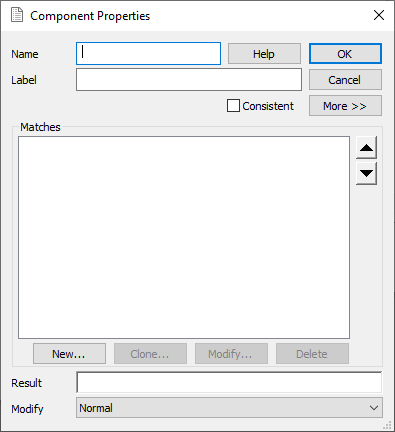
- Type in a Name for the Component you are writing. For example for DD/MM/YYYY you might call one of the components ‘Day’, which you would type in the Name space. In Label you might write ‘Day part of Date’.
- Select New to create a Match for the Component.
- The Match Pattern dialog displays.
- You build up the pattern to match from text and components. You can use the buttons on the dialog to select items, or right-click the Match field to display the context menu.
- Either type a text string into the Match box or double click one of the Global Patterns to select it.
- For the day component you would want one digit or two digits recognised, as respondents would be likely to type in either one or two digits when answering this part of the question. For example: 01 or 1 when referring to the first day of the month.
- If you are looking for a particular character click Characters… to show more options in the Character Selection dialog.
- Highlight the characters required and click OK. If a letter is selected, both the lower and upper case version will show in the match unless Case Sensitive is ticked.

- For the first two-digit match of the Day example:
- either double-click digit in Global Patterns twice
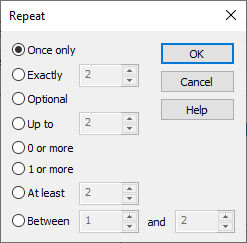
- or double-click digit and then use Repeat to permit multiple copies.
The Repeat button gives options for each part of the Component. Ensure that the part of the Component you want to affect is highlighted before selecting a Repeat command. Each of the commands creates constraints which the data must adhere to in order to fit the pattern.
- Click OK to return to the Match Pattern dialog and OK again to return to the Component Properties dialog.
- Once satisfied with all the Components, return to the Pattern Properties dialog.
Deleting components
If you wish to delete any of the Components, highlight it and click Delete. You are shown a warning message and asked to confirm that you want to delete the component.
Creating the match from the components
- On the Pattern Properties dialog you will see that you now have a list of Components but no overall Match for the pattern. Select New under the Matches part of the dialog and the Match Pattern dialog will display again

- The newly built components will show in the left-hand column. You can now create a match from both your components and the existing Global Patterns. Characters and Repeat work in the same way as previously explained.
- Select the year (4 digit) component, then month and day.
- Click OK when you have finished to return to the Pattern Properties dialog.
Testing a pattern
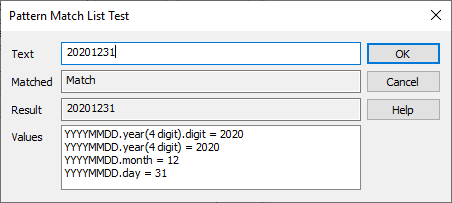
- Once you have created, cloned or modified a pattern, you can test it by clicking Test on the Pattern Properties dialog. The test dialog appears.
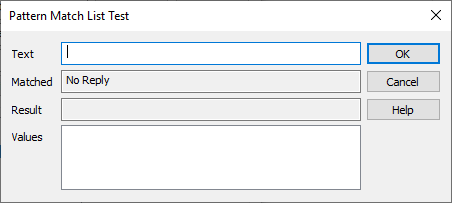
- Type in a sample of data into the Text box. For example, for the date pattern you might type in 20201231.
- If the pattern works correctly it will show that it has matched the data, the result that will display in Snap and the Values of each of the component parts.
If the test fails either the text does not fit the pattern or the pattern needs editing.
Result and Modify Case only alter the way the data is displayed in the analysis.
Modifying, cloning and deleting patterns
- Select View | Patterns to open the patterns dialog. (Prior to build 12.10 this was on the Tailor menu.)
- Highlight the required Pattern and click either Clone or Modify to access the Pattern Properties dialog box and then follow the instructions for creating a pattern provided earlier in this section.
- If you wish to delete a pattern, click Delete. You are shown a warning message and asked to confirm that you want to delete the component.
You are unable to delete any of the System patterns provided with the software.
If you delete a component, you will need to modify any matches that contain the component, otherwise the associated pattern will not work correctly.
Always ensure that the longest match string is at the top of the list to improve the search efficiency when the pattern is in use. For example in a list of Matches of {digit} {digit}, {digit} {letter}, {digit} they should be listed in this order to identify answers with two digits before classifying them as errors from the other two matches.
Copying patterns between surveys
If you already have a survey containing patterns that you need, you can copy these to another survey by saving them in SnIF format or to the clipboard.
- Open the survey containing the patterns you wish to copy.
- Select View | Patterns to open the Patterns dialog. (Prior to build 12.10 this was on the Tailor menu.)
- Click Export to display the Pattern Export dialog box. The format will be set to SNAP Xml Format (SnIF Xml).
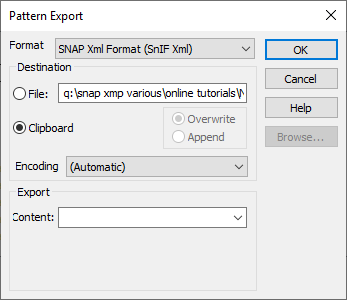
- Set the Destination as Clipboard. If you are saving a very large amount of data, you may need to save to a file instead.
- Enter the names of the patterns you wish to export in the Content field (leave blank to export all user-created patterns).
- Click OK to export the selected patterns. A confirmation message appears showing the number of patterns exported (this will not include standard patterns provided in all surveys).
- Open the survey that you wish to copy the patterns to.
- Select View | Patterns to open the Patterns dialog. (Prior to build 12.10 this was on the Tailor menu.)
- Click Import to display the Pattern Import dialog box. The format will be set to Snap Interchange Format (SnIF).
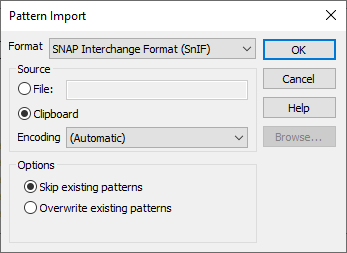
- Set the Source to the file or Clipboard that you previously exported the patterns to.
- Click OK to import the patterns. A confirmation message appears showing the number of patterns imported.