Exporting the source file for translation
These instructions show how to create the translation file containing the text that you need translating.
Preparing external translation
- Open your survey in Design mode
- Select File|Translation to open the translation wizard.
- Select Prepare External Translation from the Action drop down list.
- Click Next.
Setting the export languages
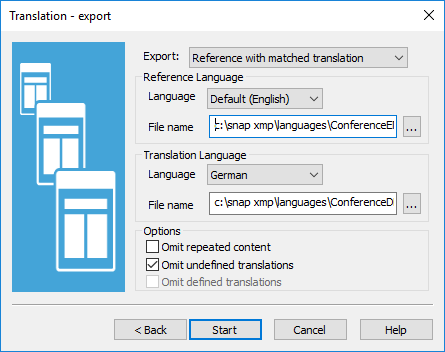
- If you already have translated some of the questions, export to a Reference with a matched translation. This creates two files, one with the list of text to be translated, and one with the list of texts that have been translated with gaps for untranslated text. If you do not have an existing translation, you can create a Reference file only.
- Specify the Reference Language (the language that you will translate from) and the name of the file where the list of texts will be saved. By default, the file name is the survey filename with a TXT suffix.
- If you are creating a matched translation, specify the Translation Language (the language that your text will be translated into) and the name of the file where the list of existing translation texts will be saved. Ensure that this is a different file name to the reference language file name.
Setting the export options
- Select the Omit repeated content box to limit the number of texts in the translation file. This omits duplicates of complete questions, instructions and labels (such as “Other”).
- Clear the Omit undefined translations, if available. Use this when you are exporting a translated survey for use in translating other surveys.
- Select the Omit defined translations if you are creating a single file. This leaves out already translated phrases. If you are not sure about your existing translations, clear this box to translate all the survey text.
- Click Start to start the export. When the export completes, you will see a translation report. You can save this to a file or print it by clicking the Send To button.