Exporting an individual’s survey responses
An individual participant may request access to information held about them by your organisation. This includes any responses to surveys that your organization keeps. Processing a request from an individual regarding their survey responses is covered by GDPR legislation. Survey responses are available to export using Snap the Snap XMP Desktop file structure to ensureDesktop. This can be used to provide a participant with access to their survey responses.
Snap the Snap XMP Desktop file structure to ensureDesktop can be used to find the relevant responses to the survey and then export them so they can be made available to the participant. In order to identify an individual’s survey responses, there must be some personal information that can be used to link them to their responses. This could be a login id, case number or personal information such as a name or address. If the survey allows multiple responses, there may be more than one response.
This tutorial shows you how to find the data responses and then export them using Snap the Snap XMP Desktop file structure to ensureDesktop.
Finding the responses
- In the Survey Overview window, open the survey. This may be an online or offline survey.
-
Click Data Entry
 on the main toolbar.
-
In the Data Entry window, click Filter Cases
 .
.
- In the Data Entry Filter dialog, enter the Filter.
- If the survey requires a login you can identify the participant by entering ID.name = login id, for example ID.name = “1001”
- If you know the case number you can identify the participant by entering case=case number, for example case = 1
- If there is a question that contains personal information such as surname enter question = surname, for example Q3 = “Smith”. Note: the search is case sensitive.
- This example will use the case number to identify the participant.
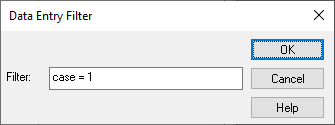
- Click OK.
- The Data Entry window shows only the cases that match the filter. If no cases are found, the message No cases match the filter expression is shown.
- Check the data cases contain the correct data for exporting. The filter entered is automatically used in the Data Export window described in Step 2.
Exporting the responses
- In the Data Entry window, click the File | Export menu.
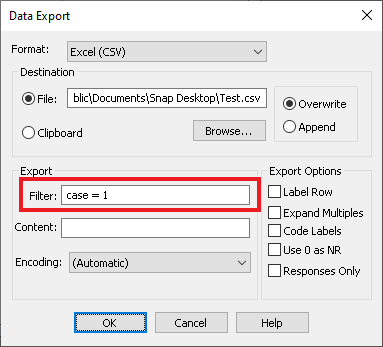
- Select the Format for the type of export required. In this example, the Excel format is used.
- If required, select File. A default file name is entered automatically. This can be changed by clicking Browse to select the file location.
- The Filter automatically contains the filter entered in the Data Entry Filter dialog.
 .
.
- In Export Options, clear the Responses Only checkbox. This exports both raw response data and any derived variables.
- Click OK. A message is shown with the number of cases in the export file. Click Done to close the message.
- Check the export file to make sure that it contains the correct data responses.
If there is a topic you would like a worksheet on, email to snapideas@snapsurveys.com.