Entering data from paper questionnaires
You can enter data from paper questionnaires by
- keying the data into the Data Entry window
- designing the questionnaire as a scanned survey and scanning the questionnaires
Choosing the data entry mode
Choosing a method of data entry depends on the type of survey being undertaken as well as the personal preference and experience of the operator.
- Select the preferred mode of data entry. This can be
- Questionnaire
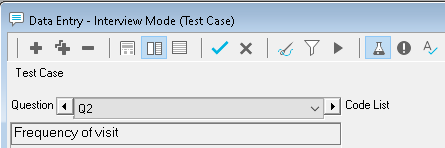
- Interview
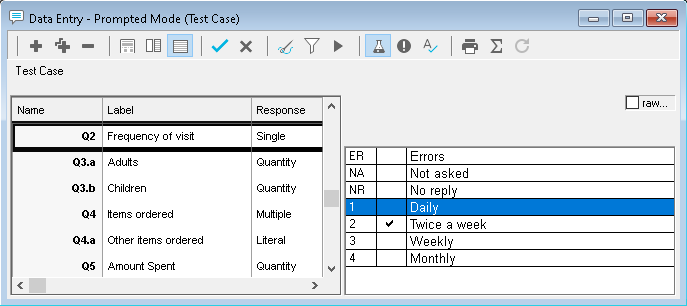
- Prompted
- Set the chosen mode in Data Entry Tailoring as the default setting for the survey so that each time the Data Entry window is opened it appears in this mode. You can also choose other settings for the data entry.
Testing the questionnaire
Before keying in a survey’s response data, you should test the questionnaire to ensure that no errors have been made in the setting up process. This involves entering one or more test cases into the questionnaire to check the questions and survey logic such as routing and validation. The test data is not stored and does not affect the survey analysis.
These are some tests to perform:
- Test the routing of the questionnaire to make sure that the correct questions are displayed according to the responses given.
- Test the question response settings for every question, such as checking that a multiple response question accepts more than one answer.
- Check that the codes are in the right order for single-response, multi-response and grid questions.
Testing in different data entry modes
- Click
 to display the Data window for the current survey.
 - Set the Data Entry Tailoring to the options you require.
- Click one of the mode buttons Questionnaire
 , Interview
  or Prompted
  to display the data in the required mode.
 - If there is no data entered then a test case will automatically appear, otherwise click
 to create a new test case. The cursor will move to the first question.
 - The questionnaire can be checked by entering a value for each question and pressing Enter to move to the next question. If Continuously has been selected in the Data Entry tailoring options the cursor moves onto the next question.
- In prompted mode, press F5 or double click in the reply field and a full list of codes will be displayed for the current question.
- In Questionnaire and Prompted modes, if you wish to test individual questions you can move up and down through the questionnaire using the up and down arrow keys or by scrolling. In Interview mode:
- Click
 or press Enter to move to the next question or note.
 - Click
 to move to the previous question or note.
 - Click
 to move to a specific question or note.
- Click
- If you enter invalid data, such as a letter in a quantity question, an error message is displayed. Press OK to enter the data for that question again.
- At the end of the questionnaire, you will be informed that you have finished entering a test case. The data entered will not be saved.
Preparing to enter replies
When entering case data from paper questionnaires, it is a good idea to:
- Number each paper questionnaire to correspond with the case number shown on the screen, giving an easy cross-reference should editing or verification be required. If you are keying data on more than one PC you might want to add a letter to identify to which set of cases the questionnaires belong.
- Produce some tables after entering about 20 cases to check that data is being entered correctly.
Enter the replies from the paper questionnaire
Data is stored as each completed case is entered so in the event of power failure only the case currently being entered would be lost.
- Click
 to display the Data window for the current survey.
 - Set the Data Entry Tailoring to the options you require.
- Click one of the mode buttons Questionnaire
 , Interview
  or Prompted
  to display the data in the required mode, if it is not automatically selected.
 - Click
 to enter a new data case and the case number will be incremented by one. The first question will be highlighted.
 - Type in a valid value code number for a single choice or multiple-choice question or a valid value for an open-ended literal, quantity, date or time.
- If you do move automatically to the next question, click Enter. In Interview Mode you may click
 instead of Enter.

- At the end of the questionnaire, you will be presented with the options to Continue, Modify, Cancel or End.
- Continue will save the current case and move straight on to the next new case.
- Modify will allow modifications to be made to the current case.
- Cancel will cause the current case to be abandoned without saving the changes.
- End will save the current case and halt data entry.
Useful tips
- If you are unsure of the available codes in prompted mode, press the F5 key or double click in the reply field and a full list of codes will be displayed for the current question.
- If text substitution has been used in the setting up of the questionnaire, its effects will be shown in the data entry screen, such as, question text changes depending on previous answers
- To check or make changes to previous questions in Interview mode:
- Click
 to move to the previous question or note.
 - Click
 to move to a specific question or note.
- Click
- You can use the up and down keys to move around the questionnaire or use the mouse to click on the scroll bars on the right hand side of the screen in Questionnaire Mode or Prompted Mode.
- Pressing Esc at any point during data entry will cause the Continue / Modify / Cancel / End dialog box to be displayed. Selecting End or Continue will save the case at the point Esc was pressed.