Database link wizard: Select Database
The Select Database page is available when you use a database link to import or export data from a database, set up emails for an online survey or connect to a respondent database for a Snap XMP survey. This page allows you to select the database you are linking to, and apply any filters or passwords required.
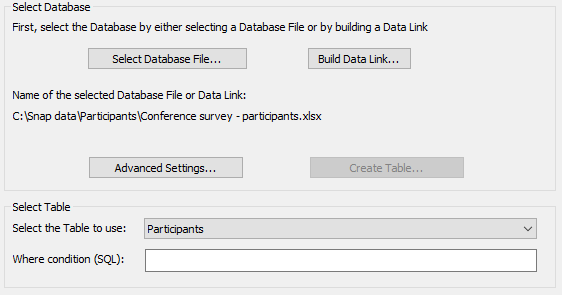
Table of fields
| Select Database File | Open a file selection dialog to select the database that you are linking to. |
| Build Data Link | Open the Microsoft data link tool to specify the type of database that you wish to link to. This is only required for unrecognised database types. |
| Advanced Settings | Open the database link Advanced Settings dialog to specify further details of your database. |
| Create Table | Export only: Add a new table to the selected database on file export. By default, exported cases will be added to the new table. |
| Select the Table to use | Select the database table from the dropdown list to import from or export to. |
| Where condition (SQL) | Import only: Specify a suitable SQL filter condition to select data from the database. (This expression will depend on the database you are using and the data you wish to import.) |
Selecting a database
- In the Select Database page, you can select the link to your participants’ data. There are two choices depending on the format in which your data is stored.
- Click Select Database File and browse to the Excel or MS Access file containing the participants’ data. This needs to include a unique id, such as a username or login id.
- Click Build Data Link to build a link to an Oracle or SQL Database containing the participants’ data. This needs to include a unique id, such as a username or login id.
- The Select the Table to use drop-down automatically displays a table name. If this is not the table you require, select a different table from the list. If you wish to filter the participants so that this survey is only available to some members of the database, set an appropriate filter in the Where condition box. Click Next.
- The next step depends on the options required for the survey. Click on the link that matches your required choice and follow the instructions given:
- Sending email invitations only with the option to seed the email invitation
- Using logins only with the option to seed the questionnaire
- Using Logins and sending email invitations with the option to seed both the email invitation and the questionnaire