Cleaning data
An important part of the data editing stage is to clean the data. Snap XMP has already detected the data and stored its interpretation in a form ready for analysis. However, it is wise to carry out the cleaning stage to ensure that the data detection stage has been sufficiently accurate.
- Open the Data Entry window
 and select the Keying/Cleaning
  button.
 - Click the Cleaning tab.
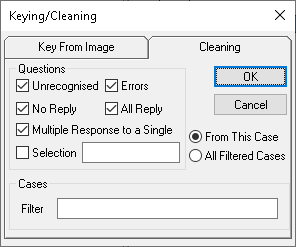
- There are five options under the Cleaning tab. Select all five options to ensure that no incorrect data is missed.
Unrecognised | Detection of cases where Snap XMP has not recognised the entry boxes. It will be necessary to key in the responses manually. This could arise from poorly printed questionnaires that are misaligned. |
Errors | Data is out of range or the wrong data type appears in questions set as Quantity, Date or Time. |
No Reply | No value has been selected. Normally this is because the respondent failed to answer a question. |
All Reply | The situation where every box has been ticked on a Multiple Response question. |
Multiple Response to a Single | This might be an error on the part of the respondent in that they provided more than one answer to a Single Response question. Alternatively, it might indicate an error in the deskewing process. |
- Click OK to start the cleaning process. Messages will appear above the scanned image explaining any specific errors. The variable that needs cleaning is highlighted.
-
Make the necessary corrections then press Enter to advance to the next question response to clean until the Keying Completed message is displayed. Click OK to finish the cleaning.
View scanned images of free text questions
The scanning and detection process automatically saves a scanned image of each handwritten reply without making an attempt to interpret the text. You can then print a report of all your scanned images.
This option is best if you are not planning in-depth analysis of free text replies but would like to view the comments which have been made.
- Open the Data Entry window
 and select the Print button.
 - In the Print Data dialog, enter the open response question in the Content field.
- Leave ticks in the boxes for Show boxes only, Remove blank space and Show case number.
- Click Setup in order to access your printer settings and if you want to include a Header/Footer.
- Click OK.
- The printed report or PDF lists the text images captured for the open ended question.