Changing the position of text and the size of table cells
The text in tables is placed in cells. You can position the text in the top, bottom or middle of a cell, and aligned left, right or centre. You can also specify how far the text is from the edge of the cell to give more or less space between the text and cell borders.
You can specify how many lines you can use to write the text, and how big the cells are.
- Open the table to be changed
- Click F2 or right-click and select Styles from the context menu to open the Define Table Style dialog.
- Select the areas of the table that you wish to alter in the left-hand pane.
- Click in the appropriate place in the Alignment pane to change the position of the text in the cells.
- Set the values in the Margins to set the distance of the text from the edges of the cells.
- Click Apply to check the table looks the way you would like, and OK if satisfied.
Setting the size of cells
You can change the size of table cells by dragging the row and column borders. These changes will not be stored in the style file if you save it.
- Move the mouse over the gap between columns until the cursor changes to a double-headed arrow.
- Drag the column or row border to the position that you want.
Note that if the rows or columns have been set to Keep all the same size in the Cell Sizing dialog; when you drag one border, all the rows or columns resize together. If you want to drag them individually, you need to open the Cell Sizing dialog and clear Keep all the same size.
These changes are not automatically saved when the table is saved.
It is possible to set the size of the table cells to a fixed width/height so that it is stored in the style file.
- Open the table to be changed.
- Click F2 or right-click and select Sizing from the context menu to open the Cell Sizing dialog.
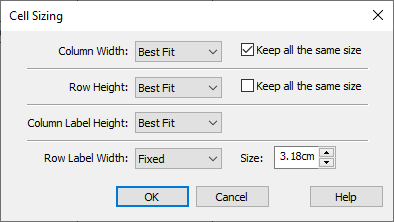
- Choose from Best Fit, Fixed or Variable cell size for the Column Width and Row Height.
- Best Fit lets Snap calculate the cell size according to their contents
- Fixed lets you to set the size in the Size field displayed when this option is selected
- Variable lets you drag the cell to set the size.
- When you choose Best Fit you can check the Keep all the same size box to force all rows to have the same width or height.
- Choose from Best Fit or Fixed for the Column Label Height or Row Label Width, as required.
- Click OK to apply your settings. These settings will be saved if you save the style.