Creating database links to upload participants
Database links can be used to link a file or database containing participant information to a survey. The participant information can include logins, details used to seed the questionnaire, as well as email addresses and seeding used to send email invitations.
Creating a database link lets you
- provide the participants’ names and email addresses
- set up a requirement to login and seed the survey with participants’ login data
- seed the questionnaire with participants’ data
- create email invitations and reminders
Database links are created using the database link wizard.
There is initial setup that is necessary for all database links.
- Create the participant data file with the correct data. This may be a database or data file, such as a CSV or Excel file.
- Create the database link
- Select the participant data file.
There are several options available for linking participants following the initial setup stages.
- Sending email invitations only with the option to seed the email invitation
- Using Logins only with the option to seed the questionnaire
- Using Logins and sending email invitations with the option to seed both the email invitation and the questionnaire
Following the database link set up you need to run the database link to upload the participant data to the survey.
Creating the participant data file
What you need in your database (for seed data, email invites and/or logins)
To send emails | To login participants | To seed data into your survey |
A unique email address for each respondent | A unique login for all participants (this can be their email address) | A database field for each survey variable that you want to load with data |
This table shows the required elements for each database record for the different operations.
| Unique email address | Unique participant login | Participant password | Fields containing data |
Send email invitations | 
|
|
|
|
Participant’s login | Emails do not have to be unique for login |
| If required |
|
Seed data |
|
|
|
|
An example of an Excel database file is shown below.

This database file contains
- unique email addresses used to send email invitations
- usernames and password data used for participant logins
- two columns that contain seed data, First name and Age (from a single choice age range question)
Creating the database link
- Open the survey in Snap XMP Desktop.
-
Click Database Links
 on the toolbar or select File | Database links to display the Database Links dialog box.
- Click New to create a new database link. The Database Linkage Wizard is displayed.
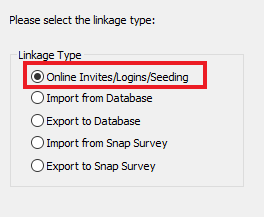
- Select the Online Invites/Logins/Seeding radio button as the Linkage Type. This is the default option.
- Click Next to move to the Select Database page.
Selecting the participant database or file
-
In the Select Database page, you can select the link to your participants’ data. There are two choices depending on the format in which your data is stored.
- Click Select Database File and browse to the Excel or MS Access file containing the participants’ data. This needs to include a unique id, such as a username or login id.
- Click Build Data Link to build a link to an Oracle or SQL Database containing the participants’ data. This needs to include a unique id, such as a username or login id.
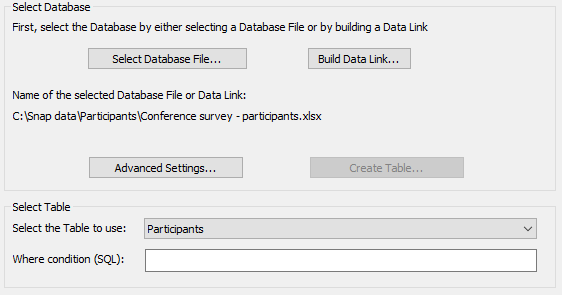
- The Select the Table to use drop-down automatically displays a table name. If this is not the table you require, select a different table from the list. If you wish to filter the participants so that this survey is only available to some members of the database, set an appropriate filter in the Where condition box. Click Next.
- The next step depends on the options required for the survey. Click on the link that matches your required choice and follow the instructions given:
- Sending email invitations only with the option to seed the email invitation
- Using logins only with the option to seed the questionnaire
- Using Logins and sending email invitations with the option to seed both the email invitation and the questionnaire
Sending email invitations only
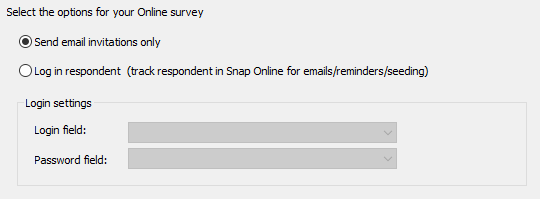
- On the next page select the option Send email invitations only. Click Next.
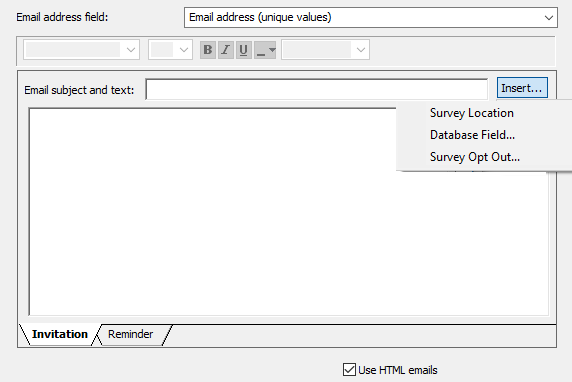
- The next step in the wizard is to create the email invitation and reminder. Here you can design your email invitation and reminder.
- Set the email address field to be the appropriate database field in the drop-down list.
- You will need to insert the Survey Location into the main body of the email. This will let your participants know where your survey is located.
- You can add seeding by inserting a Database Field in the main body of the email or the Email subject.

- Click Next. You will see a summary of what the database link does.
- Enter a name for the link and click Finish.
- The next step is to run the database link.
Using Logins only
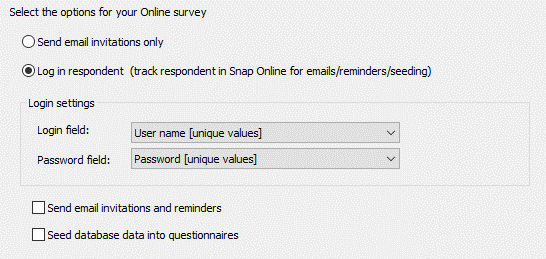
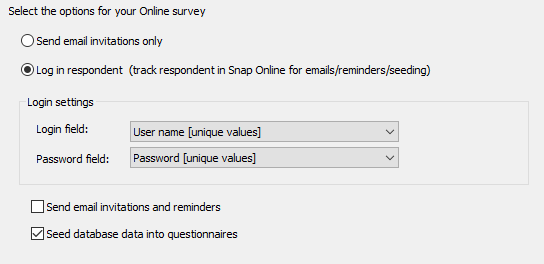
- On the next page select the option Log in respondent.
- If you want to add seeding to the questionnaire, select Seed database data into questionnaires and follow these instructions to add questionnaire seeding, otherwise click Next to see a summary of what the database link does.
- Enter a name for the link and click Finish.
- The next step is to run the database link.
Using Logins and sending email invitations
- On the next page select the option Log in respondent.

- Select Send email invitations and reminders. This option allows you to create invitations and reminders in the Email editor page.
- If you want to add seeding to the questionnaire, select Seed database data into questionnaires.
- Click Next.
- The next step in the wizard is to create the email invitation and reminder. Here you can design your email invitation and reminder.
- Set the email address field to be the appropriate database field in the drop-down list.
- You will need to insert the Survey Location into the main body of the email. This will let your participants know where your survey is located.
- You can add seeding by inserting a Database Field in the main body of the email or the Email subject.
- If you have selected Seed database data into questionnaires, follow these instructions to add questionnaire seeding, otherwise click Next to see a summary of what the database link does.
- Enter a name for the link and click Finish.
- The next step is to run the database link
Questionnaire seeding required
- The questionnaire seeding page is displayed if you have selected Seed database data into questionnaires. Click Next. (If you want to seed group questionnaires click Setting up a database link for group questionnaires)
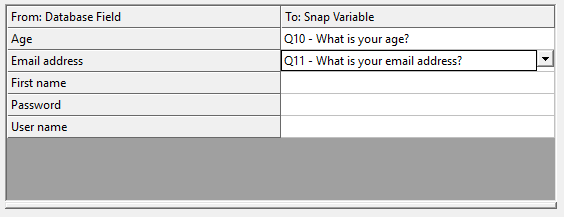
- To seed (transfer) data from a database field to a question variable in the survey, click in the area to the right of the field and select the survey variable from the drop-down list.
- Single and multiple-response questions in Snap XMP Desktop have a code for each possible answer. You can seed data directly into one or more codes.
Column | Description |
Database values | The possible values for the selected field in the database. |
Counts | The number of cases in the database with the specified value. |
Snap code index | The different possible responses to seed into. |

- Select the code that you wish to seed for a given value of the database field. The example shows different age range fields in the database being seeded into the single-multiple response question Age. If the Age field in the database is set to 2 the age range 25 to 44 will be seeded into the field.
- Click Next. You will see a summary of what the database link does.
- Enter a name for the link and click Finish.
- The next step is to run the database link.
Running the database link
When you have set up the participants, invitations and seeded data for your survey you need to run the database link. This will generate the participant and invitation data for the online survey making it available in Snap XMP Online.
Instructions to run the database link
- Select File | Database Link to display the Database Links dialog.
- Select the link that contains the participants’ data.
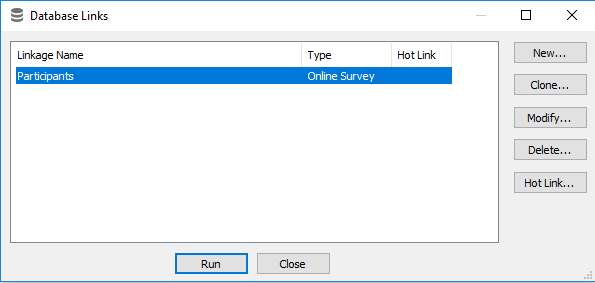
- Click Run to generate the new participant data. The Run Database Link dialog appears.

- Choose an option for Participants and Seeding.
| Option | Description |
|---|---|
Do nothing | Does not load any participant or seeding data changes to Snap XMP Online. |
| Add new participants only | Participants in the spreadsheet that are not already in the list will be added. The survey options for sending invitations and tracking the response cannot be changed. |
| Update participants | Participants in the spreadsheet that are in the list will be updated (seeding properties will also be replaced). Participants in the spreadsheet but not in the list will be added. The survey options for sending invitations and tracking the response cannot be changed. |
| Replace all participants | New participants will be added. Participants in the spreadsheet that are in the list will be updated (seeding properties will also be replaced). Participants that are in the list but absent from the spreadsheet will be deleted. Existing response data will NOT be deleted. The survey options for sending invitations and tracking the response can be changed. |
| Delete participants | All current participants will be deleted. The response data will NOT be deleted. |
- Choose an option for Invites and Reminders.
Option | Description |
Do nothing | There are no changes made. The process will not upload any invitation or reminder changes to Snap XMP Online. |
Define or replace | This will add the invitation and reminder when they are generated for the first time. When there are already uploaded invitations and reminders this option will remove all the existing invitations and reminders to replace them with the new invitation and reminder set up in Snap XMP Desktop. |
- Click OK to upload the participant data to Snap XMP Online.