Seeding the login details via the URL for a tracked survey
Snap XMP Online contains a built-in mailing system to send invitations to participants. If your organisation would like to use their own mailer to send out invitations to a logged in survey, then you can create a URL for the survey containing the username of the participant to use instead.
This tutorial shows how to seed the username of a participant into a logged in/tracked survey, so you can send the URL to a participant outside of the mailing system built into Snap XMP Online.
Tracking participants using a URL
What you need
You will need a spreadsheet or database that contains the participant information. For participants to log in to your survey you need to upload a unique username for each participant. This can be their email address. You can also add additional fields, which are optional, that seed into the survey to personalise it.
Here is an example of an Excel spreadsheet with participant data.
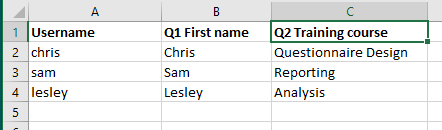
This data file contains
- unique username used for participant logins
- two columns that contain seed data, Q1 First name and Q2 Training course. These are used to personalise the survey.
Uploading the participants
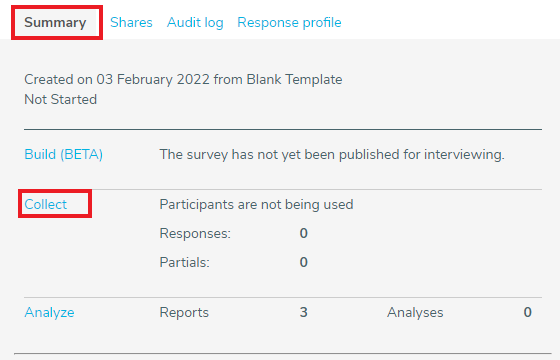
- Once you have created your survey and it is on Snap XMP Online you can upload the database of participants. Open Snap XMP Online on your browser, click on the related survey and from the survey’s Summary click on the Collect link.
- Select the Participants side menu to view the participants and invitations. The Overview is selected by default.
- Click on the Participant list menu item to view the participants.

- Click on Upload Participants to open the Upload Participants Wizard.
- The wizard guides you through the process of uploading the participants to your survey. You can find further information about using the wizard at Uploading participants from a spreadsheet.
Creating the URL to send to the participants
- Once you have uploaded your participant list then you need to export the list to a CSV file. This generates a unique identifier for each participant, also referred to as a GUID. Now you have uploaded the participants there is now the option to Export. Click on Export and then select Export to CSV.

- When you open the CSV file you will see it has generated the Participant ID number, this is the number you need to use at the end of your survey link relating to each participant.

- The link is made up of the Interview URL for the published survey following by “?PID=” then the Participant ID. This example uses the Participant ID for lesley and the link for this participant will look something like below:
https://online1.snapsurveys.com/s/9raksp?PID=8e4576f8-9e5c-43f2-b8ac-0c7eb1dd045e
Reserved keywords
There are two reserved keywords in Snap XMP, which means they cannot be used as variable names:
- pID (used for participant ID)
- rID (used for response ID)
The reserved keywords are not case sensitive. If someone were to create a survey and have these as named variables then manual seeding of the url will not work because Snap XMP Online is already using them.