Scanning and detection
Your completed questionnaires are now ready to be scanned. Once scanned in, Snap will deskew (check for misalignments) and detect the values on the questionnaire, creating the case data.
- Open the Data Entry window
 and select Interview Mode
  .
. - Click
 for New Case. The Acquire window opens. Click OK.
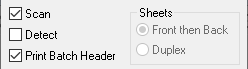
 - Select Scan and Detect to scan and detect the values on the questionnaire.
- Select Print Batch Header to print a report of the scanned questionnaires from the current batch. The report lists date and time, together with the name of the survey, and the case numbers allocated within the survey. Attaching the Batch Report to each batch of questionnaires that have been scanned can help if there is a need to examine the questionnaires at a later date.

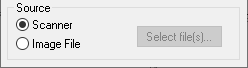
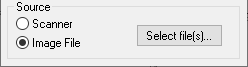
- In Source, select Scanner, if you are scanning the questionnaires, or Image File, if you are loading image files containing the scanned questionnaires.
Using Scanner
- If you are scanning the questionnaires, place your completed questionnaires in the scanner and click OK.
- The questionnaires are scanned and once completed a message is displayed, showing the number of sheets read and cases detected. Click OK.
Using Image Files
- If you are using image files that have previously been scanned and are stored on an accessible drive, browse to the folder where your PDF/TIFF files are stored. Click Select file(s) and select the image files.
Scanning questionnaires and detecting responses separately
For larger volumes it may be advisable to separate the scan and detect processes. Scanning the questionnaires becomes faster as the detection process is run later, at a convenient time, to process images, detect the questionnaire responses, and create the Snap .rdf data files.
Scanning without detecting
-
Click
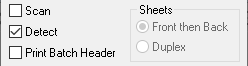
 . The Acquire window opens. Select Scan and clear Detect. Only the scanning will be performed.
- Click OK.
Detecting without scanning
With a number of scanned images ready to detect, the same procedure is followed.
-
Click
 . The Acquire window opens. Clear Scan and select Detect. Only the detection will be performed.
- Enter the Starting Case and Number of Cases to indicate which cases to detect.
- Click OK.