Print scanned image data reports
A scanned image data report is a quick and easy way to view handwritten replies, without the need to wait for scanned questionnaires to be detected and keyed.
Prior to printing the data report, you must have retained the image files created by the scanning process. Scanning must be activated from the Data Entry Tailoring window by selecting the Scanning check box.
To print the scanned data report:
- Click Data Entry
 on the Snap XMP Desktop toolbar. This opens the Data Entry window.
 - Click Print
 to open the Print Data dialog. (Note: You must select Scanning in Data entry tailoring to access this dialog).
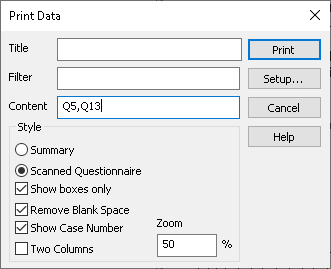
- In Title, enter a title to describe the data in the printed report.
- In Filter, you can select which results to print by entering a filter selection. Note: You can only use a variable as a filter with stored data, e.g. if you have not keyed in a Literal Response question and it only exists as an image in Snap XMP Desktop. You cannot filter a variable that has not been interpreted successfully.
- In Content, specify which variables to include in the report by entering the variable names.
- Select Scanned Questionnaire in the Style section and any other options you may require:
- Show Boxes Only: does not show question text in the report
- Remove Blank Space: reduces any space around an answer image
- Show Case Number: displays the case number on the report
- Two Columns: displays the replies in two columns
- Click OK. This prints a list of the images for the data responses.
If there is a topic you would like a worksheet on, email to snapideas@snapsurveys.com