Languages
You can also use the Editions button ![]() to add another language version to your questionnaire. This means that you can use the same questionnaire in a number of languages, such as English, French and Spanish; and to adapt the style and language of one questionnaire to make it appropriate for sub-groups, such as UK-English and USA-English or children and adults.
to add another language version to your questionnaire. This means that you can use the same questionnaire in a number of languages, such as English, French and Spanish; and to adapt the style and language of one questionnaire to make it appropriate for sub-groups, such as UK-English and USA-English or children and adults.
Adding a language
- With the Questionnaire window open, click
 to display the Editions and Style Templates dialog.
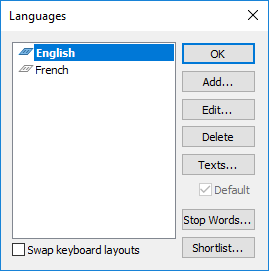
 - Click the Language button. The Languages dialog appears showing all languages currently associated with the questionnaire.

- Check the Swap keyboard layouts box to make Snap automatically change to the appropriate keyboard setting for that language. This can be useful for language specific symbols but can be difficult for anyone used to a particular keyboard layout.
- Click Add. This displays the Define Language dialog.

- Using the drop-down list, select the language you want in the Name drop-down list or select the abbreviation for the language you want in the Language drop-down list.
- If you want to use a language that is not in the list you can overtype the text to create a custom language.
- Click Dictionary if you wish to set a dictionary for use with the spell checker for that language.
- Click OK to save and return to the Editions and Style Templates window which now shows all the editions with the associated languages.
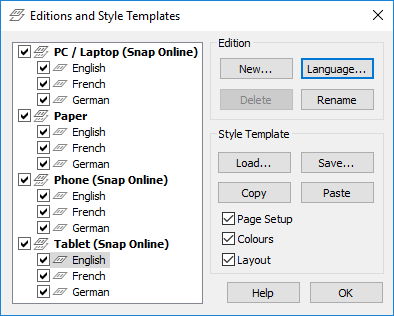
- If you do not wish to use each language with every edition, uncheck the tick box beside the language. If this box is clear, that edition will not be displayed in the questionnaire window and will not be published when you publish the questionnaire.
- Click OK to return to the Questionnaire window.
You can toggle between the language editions by
- clicking on the tabs at the bottom of the screen
- using Alt + PageUp and Alt + PageDown to switch between the tabs

If you are publishing a right–to-left language (such as Arabic) survey you may wish to add custom HTML to each of the survey pages to ensure that open response boxes are also right-to-left. E.g.
<style>
input {text-align:right !important;}
textarea{text-align:right !important;}
</style>
Changing a language
- If you need to change a language that is already specified for a questionnaire, click
 to display the Editions and Style Templates dialog.
 - Click Language to open the Languages dialog box.
- Click Edit. This opens the Define Language dialog.

- Click OK to save the changes.
If you have already translated questions into the first language, and you then change the language, the translation text will remain in the previous language. You will have to re-translate the text into the new language.
Adding a new question in multiple languages
SurveyPaks can contain multiple language versions of the same questions. Completed multi-language surveys will also contain versions of the questions for all the languages in the survey.
If you have a survey created in one or more languages, and you have a survey or SurveyPak containing translated questions in those languages, you can add these saved questions to the surveys, and the correct language version of the question will be added to all the different language versions in your current survey.
For example, if you have an existing survey that has been created in English and Arabic, and you wish to re-use the questions in another English and Arabic survey.
- Create the correct language version(s) of your survey.
- Open the reference window and find the survey or SurveyPak containing the questions and the translations of those questions that you want.
- Drag the question from the reference window into your survey.
- The same question will appear in all language versions of your survey, in the appropriate language.
Adding a derived variable in multiple languages
If you are using a derived variable codes or labels in your questionnaire or analyses, you need to provide versions of them for all the languages that you are using.
For example, if you have an existing survey that has been created in English and German, and you are using a derived variable to put an appropriate greeting in the questionnaire text.
- Create the derived variable in one language.
- Select the other language from the drop-down list at the top right.
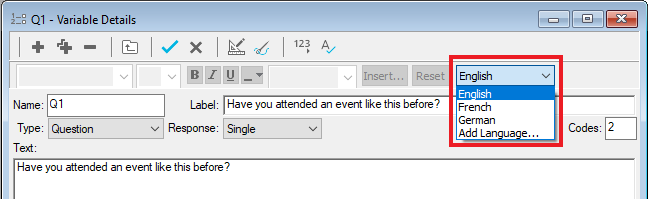
- Write the labels for the variable and codes for your derived variable in the new language.
- Repeat for any other languages.
- Click
 to save the variable
Using the automatic translation
If you have added questions to your survey, and you then add a new language, you can automatically translate the questions if the translation already exists in a SurveyPak or a survey.
- Open the Questionnaire window.
- Open the Reference window and browse for the survey or SurveyPak containing the translated questions.
- Click the Questionnaire window to make that the active window and select File|Translation. The translation wizard opens.
- Select Translate from Reference from the Action menu. Click Next>.
- Select the language to translate from (reference language) and to (translation language) in the drop-down lists.
- Check the Complete variables only box if you wish only to use translations of complete questions. Uncheck the box if you want to translate partial questions where the automatic translator finds matching parts of a question (for example, Yes and No).
- Check the Overwrite existing content box if you wish to overwrite and translated text which is already present in your survey. Clear the box if you want to preserve any existing translated text.
- Click Start.
- When the translation has finished, a translation report is displayed. You can save this to a file or print it by clicking the Send To… button.
- Inspect the translated version of your survey. Questions or parts of questions which have not been translated will display the original language in grey.
Viewing variables available in other languages
- Click
 or press Alt+F12 to open the Reference window. Select the survey or SurveyPak containing the questions you are interested in.
 - Select the language of your choice in the drop-down list. If the language is not visible in the list, then it is not available in the stored survey or SurveyPak. If a specified language has not been added to the current open survey, its name will be greyed out in the language list. You can still select it and examine the questions.
- Questions that are available in the chosen languages will be displayed.
If the current open survey is multi-language, and questions in the SurveyPak are not available in all the languages used in the survey, then those questions will be in grey. Questions available in all languages used in the survey are in black.
Using an external translator
If you do not already have translations of your survey questions, you will need to get the survey translated. The most common process of doing this, is to export a text file containing the questions to be translated, and ask the translators to provide matched translations in the specified format.
Exporting the source file for translation
- Open your survey in Design mode
- Select File|Translation. The translation wizard opens.
- Select Prepare External Translation from the Action drop down list.
- Click Next>.
- Specify how you wish your translation file to be created in the Translation Wizard Export dialog.
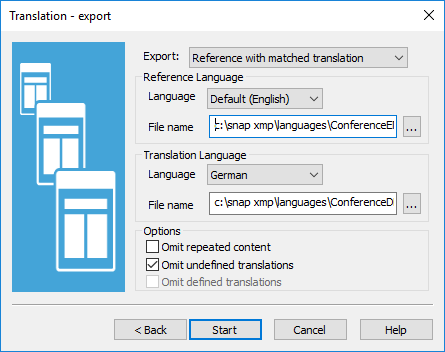
- If you already have translated some of the questions, export to a Reference with a matched translation. This creates two files, one with the list of text to be translated, and one with the list of texts that have been translated with gaps for untranslated text. If you do not have any existing translation, you can create a Reference file only.
- Specify the Reference Language (the language that will be translated) and the name of the file where the list of texts will be saved. By default, the file name is the survey filename with a .txt suffix.
- If you are creating a matched translation, specify the Translation Language (the language that your text will be translated into) and the name of the file where the list of existing translation texts will be saved. Ensure that this is a different file name to the reference language file name.
- Check the Omit repeated content box to limit the number of texts that are saved in the translation file. This omits duplicates of complete questions, instructions and labels (such as “Other”).
- Uncheck the Omit undefined translations if available (this is used when you are exporting a translated survey for use in translating other surveys).
- Check the Omit defined translations if you are creating a single file. This leaves out phrases which have already been translated. (If you are not sure about your existing translations, clear this box to ensure that all the survey text will be translated).
- Click Start to start the export. When the export has finished, a translation report is displayed. You can save this to a file or print it by clicking the Send To button.
Importing your translated file
When you receive your translated text file, check it to ensure that it matches the format of the exported file. If you are content, you can then use it to translate your survey.
- Open your survey in Design mode
 .
. - Select File|Translation. The translation wizard opens. Select Apply External Translation from the Action list.
- Click Next>. The translation wizard import dialog appears.
- Select the language in the survey that you are translating from. You would normally use the text file that you previously exported as the Reference Language file.
- Specify the language that you are translating to as the Translation Language. Select the file that you have received from your translator as the File name.
- Check the Complete variables only box if you wish only to use translations of complete questions.
- Uncheck the box if you want to translate partial questions where the automatic translator finds matching strings or words (for example, Yes and No).
- Check the Overwrite existing content box if you wish to overwrite any translated text which is already present in your survey. Clear the box if you want to preserve any existing translated text.
- Click Start.
- When the translation has finished, a translation report is displayed. You can save this to a file or print it by clicking the Send To… button.
- Inspect the translated version of your survey. Questions or parts of questions which have not been translated will display the original language in grey.
Saving your survey translation
If you have a translated survey, you can save it as a set of translated files that you can import directly, as well as opening it in the Reference window.
- Open the Questionnaire window.
- Select File|Translation. The translation wizard opens.
- Select Prepare External Translation from the Action menu.
- Click Next>.
- Specify how you wish your translation files to be saved in the translation wizard export dialog.

- Export to a Reference with a matched translation. This creates two files, one with the list of text to be translated, and one with the list of texts that have been translated.
- Specify the Reference Language (the language that will be translated) and the name of the file where the list of texts will be saved. By default, the file name is the survey filename with a .txt suffix.
- Specify the Translation Language (the language that your text will be translated into) and the name of the file where the list of existing translation texts will be saved. Ensure that this is a different file name to the reference language file name.
- Check the Omit repeated content box to limit the number of texts that are saved in the translation file. This omits repeated phrases (such as “Other”).
- Check the Omit undefined translations. This means that you will only export the questions which have been translated.
- Click Start to start the export. When the export has finished, a translation report is displayed. You can save this to a file or print it by clicking the Send To… button.
- You can then use the translation wizard to import the matched files into another survey with the same questions.