Exporting and importing a survey
In Snap XMP Desktop, you can export and import a survey and its data.
Transferring a survey from Snap XMP Desktop to SPSS
In Snap XMP Desktop, you can export surveys in a format for importing into SPSS. This format is for use with SPSS version 7.4 and above.
- Select the survey in the Survey Overview Window,
- Select File | Export to display the Survey Export dialog.
- Set the Format to SPSS Data Format (SAV).
- In the Destination section, File is selected. Either use Browse to specify the file name and path or type the details into the field.
- Click OK to export the variables to the specified file. This file is available for use in SPSS.

- For surveys that contain data, you have the option to transfer the data as well.
Note: When Snap XMP Desktop exports its codes, the SAV export does not deal with No Reply codes, therefore SPSS is left with a value of zero and a blank code label. SPSS does have missing values, so you will currently need to go through every single variable and specify 0 as a No Reply.
Note: If you export a survey from Snap XMP Desktop to SPSS and then import it back into Snap XMP Desktop, it will not appear in the same format as the original due to the different ways Snap XMP Desktop and SPSS operate.
Note: SPSS does not deal with multiple response questions in the same way. Each element of the question is single response. The conversion therefore provides a variable set containing the grouping (e.g. Q4 would become Q4_1, Q4_2, etc after the conversion) and you will need to specify the grouping in SPSS.
Transferring a survey from SPSS to Snap XMP Desktop
Surveys created in SPSS version 6.1 and above can be imported and used in Snap XMP Desktop.
- From the Survey Overview Window, select File | Import to display the Survey Import dialog.
- Set the Format to SPSS Data Format (SAV).
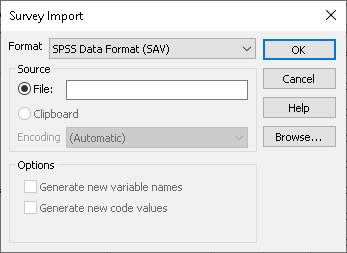
- The Source is File. Either browse to specify the file name and path or type the details into the field.
- Click OK then enter the name of the new survey.
- Click OK to import the variables into the survey.
- For surveys that contain data, you have the option to transfer the data as well. Click Yes to import the data.
Note: SPSS does not deal with Multiple Response questions in the same way as Snap XMP Desktop. In SPSS each element of the question is set up as a Single Response and the grouping indicated by the variable name (e.g. Q4z1 and Q4z2 would be the first two codes of Q4). To create a Multiple Response question you will need to create a new Derived Multiple Variable and set up the codes within it.
Transferring a survey from Snap XMP Desktop to another survey analysis package
Snap XMP Desktop is able to export the contents of a survey in a format that other survey analysis packages can import and read. This format is called triple-s and has been developed as a standard interchange format. Snap XMP Desktop will also import triple-s format files from other survey analysis packages.
Note: Some survey packages do not yet support the triple-s XML version, in which case you should use triple-s Format 1.0 or 1.1, depending on your survey package.
- Select the menu option File | Survey Overview to open the Survey Overview Window
- Select the survey to be exported.
- Select the menu option File | Export to display the Survey Export dialog.
- Specify the Format as triple-s XML (SSS) v2.0.
- Specify the Destination as File. Enter the file name or click Browse to select the file location.
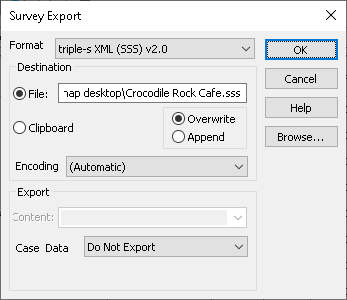
- If you wish to export case data, select a data format from the Case Data drop-down list. The data will be exported to a file with the same file name as the survey export file but with a different extension.
- Click OK to perform the export.
Transferring a survey from another survey analysis package to Snap XMP Desktop
Snap XMP Desktop can import files from other survey analysis packages using the triple-s format, which is a standard interchange format.
- From the Survey Overview Window, select File | Import to display the Survey Import dialog.
- Specify the Format as triple-s Format (SSS). Specify the Source as File. Clicking Browse allows you to view and select the file containing the survey to be imported.
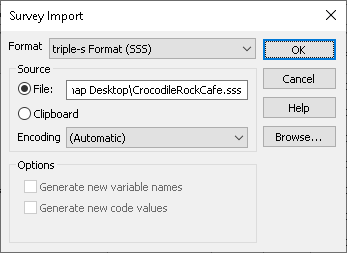
- Click OK then enter the name of the new survey.
- Click OK to import the survey details.
- For surveys that contain data, you have the option to transfer the data as well.
- Click OK then enter the data file. By default it will be set to an .asc file in the same location as the triple-S survey file that you are importing.
- Click OK to import the data.