Anonymising data after carrying out your survey
Anonymising the responses to a survey removes any reference in the data that can identify the participants. This can be very useful in preserving privacy while analysing the data. In anonymising the data the variables that can identify participants should be permanently removed. This includes the response data in the survey, archive files and any other backups.
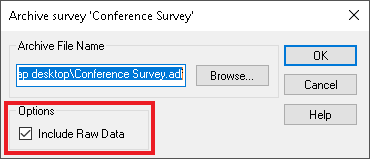
Archive the survey
- In the Survey Overview window, select the survey that you want to anonymise.
-
If it is an online survey, click Clone survey
 . Select to clone as an offline survey and select Also include raw data to include the data responses.
-
Select the offline survey and click Archive Survey
 .
.
 .
.
- A generated file name with the .adf extension is defaulted. If required, change the location and file name to match the archived file you wish to overwrite, by clicking Browse.
- Check the Include Raw Data box to include the case data in your archive.
- Click OK to archive the survey. If the survey has previously been archived to that location, you will be asked if you want to overwrite the existing file. Click Yes.
- A confirmation message is displayed when the archived is completed. Click OK.
Apply bulk changes
- In the Survey Overview window, open the survey.
-
Open the Data Entry window
 .
.
- Click Bulk Changes on the Data Entry window toolbar to display the Bulk Changes dialog.

- Filter is used to select the data responses to be changed or to exclude the ones that you do not want to change. Setting Filter to “Q8 OK” finds all valid responses to Q8.
- Variable is used to specify the variable that you want to change.
- Set the Change type to Clear response to clear the response data for the selected Variable.

- Click OK to make the bulk changes to the data. A message with the number of cases changed is displayed.
- Repeat from Step 3 to apply Bulk changes to all the variables containing data you wish to remove.
Check the data
- In the Survey Overview window, open the survey.
-
Open the Data Entry window
 .
.
- Scroll through the cases and check the data has been removed.

- Alternatively, you can also use the analyses or reports.
You should now have a file with the personal data removed.
Delete the backup
Locate the archived survey file you created in Step 1 above, archived files have the .adf file extension and delete it.
If you created a cloned survey as a backup for an online survey, this should be deleted.
Remember if you have made backups to your own systems they will also need to be deleted.
You should make sure that you don’t have any other Snap XMP files on your system that may contain personal data.
If there is a topic you would like a tutorial on, email to snapideas@snapsurveys.com.